At Hitem3D, we’re committed to meeting creators where they work. Our Hitem3D ComfyUI Plugin brings AI-powered 3D generation directly into the ComfyUI node-based workflow environment, giving technical users and developers the flexibility to build complex generation pipelines with full control over every step.
Whether you’re generating geometry from a single image, creating high-quality textures, or exporting production-ready models in multiple formats, this plugin integrates Hitem3D’s core capabilities as native ComfyUI nodes — so you never have to leave your workflow.
What You Can Do with the Hitem3D ComfyUI Plugin
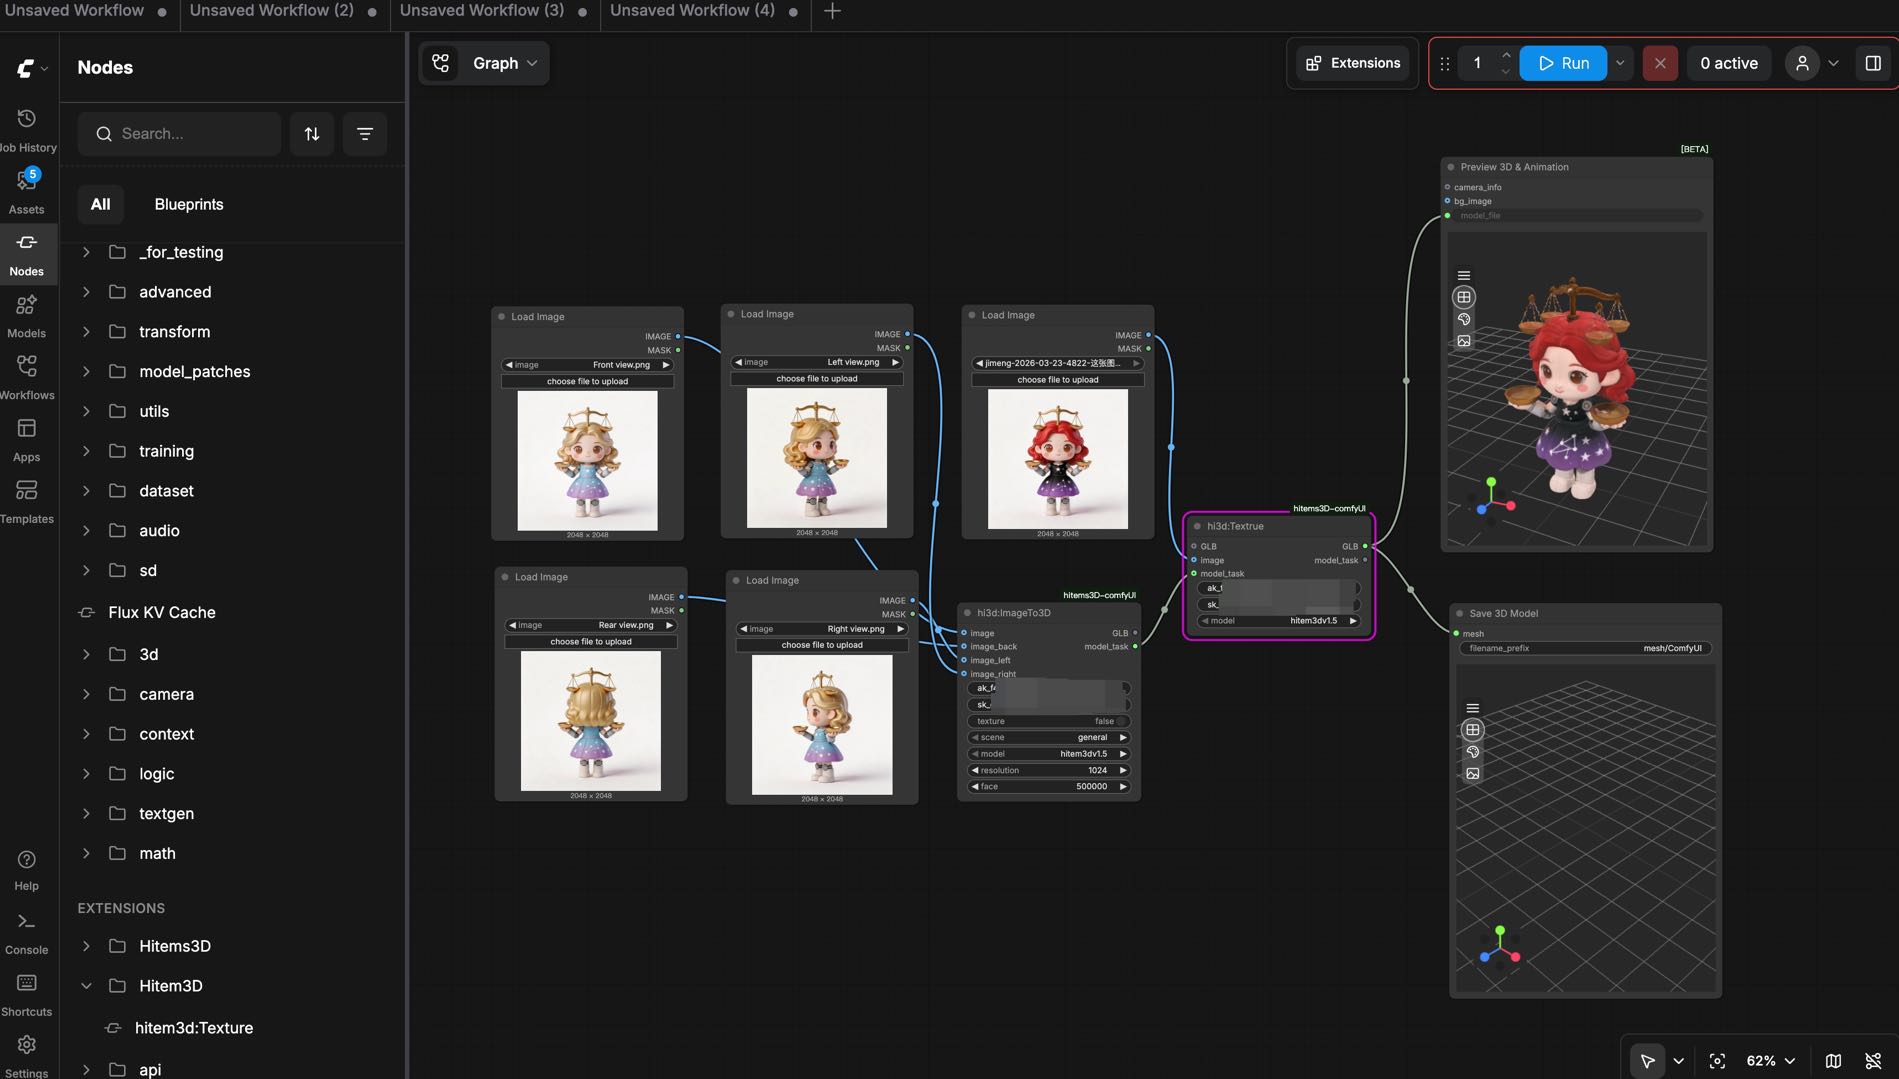
Image / Multi-view to 3D Mesh Generation: Upload a single image or multiple views and generate a 3D mesh directly within your ComfyUI workflow. Supports both General and Portrait model types.
Texture Generation: Generate high-quality textures for your geometry in a separate stage, or run geometry and texture generation together in a single pass.
Flexible Model Output: Export your models in GLB format, automatically saved to your local ComfyUI output directory.
In-workflow 3D Preview: Preview generated models using ComfyUI’s built-in preview nodes without leaving the interface.
One-click or Staged Generation: Choose between generating geometry and texture simultaneously, or run them as separate stages for finer control.
What You’ll Need
Before getting started, make sure you have the following ready:
ComfyUI (latest stable version recommended)
A Hitem3D account — sign up at hitem3d.ai
A valid Hitem3D API Key (from the API Platform)
Installing the Hitem3D ComfyUI Plugin
Before installing the Hitem3D ComfyUI Plugin, make sure ComfyUI has already been downloaded and installed on your computer.
There are two ways to install the plugin — pick whichever works best for you:
Method 1: One-Click Installation via ComfyUI Manager (Recommended)
This is the easiest installation method, ideal for users who already have ComfyUI Manager installed:
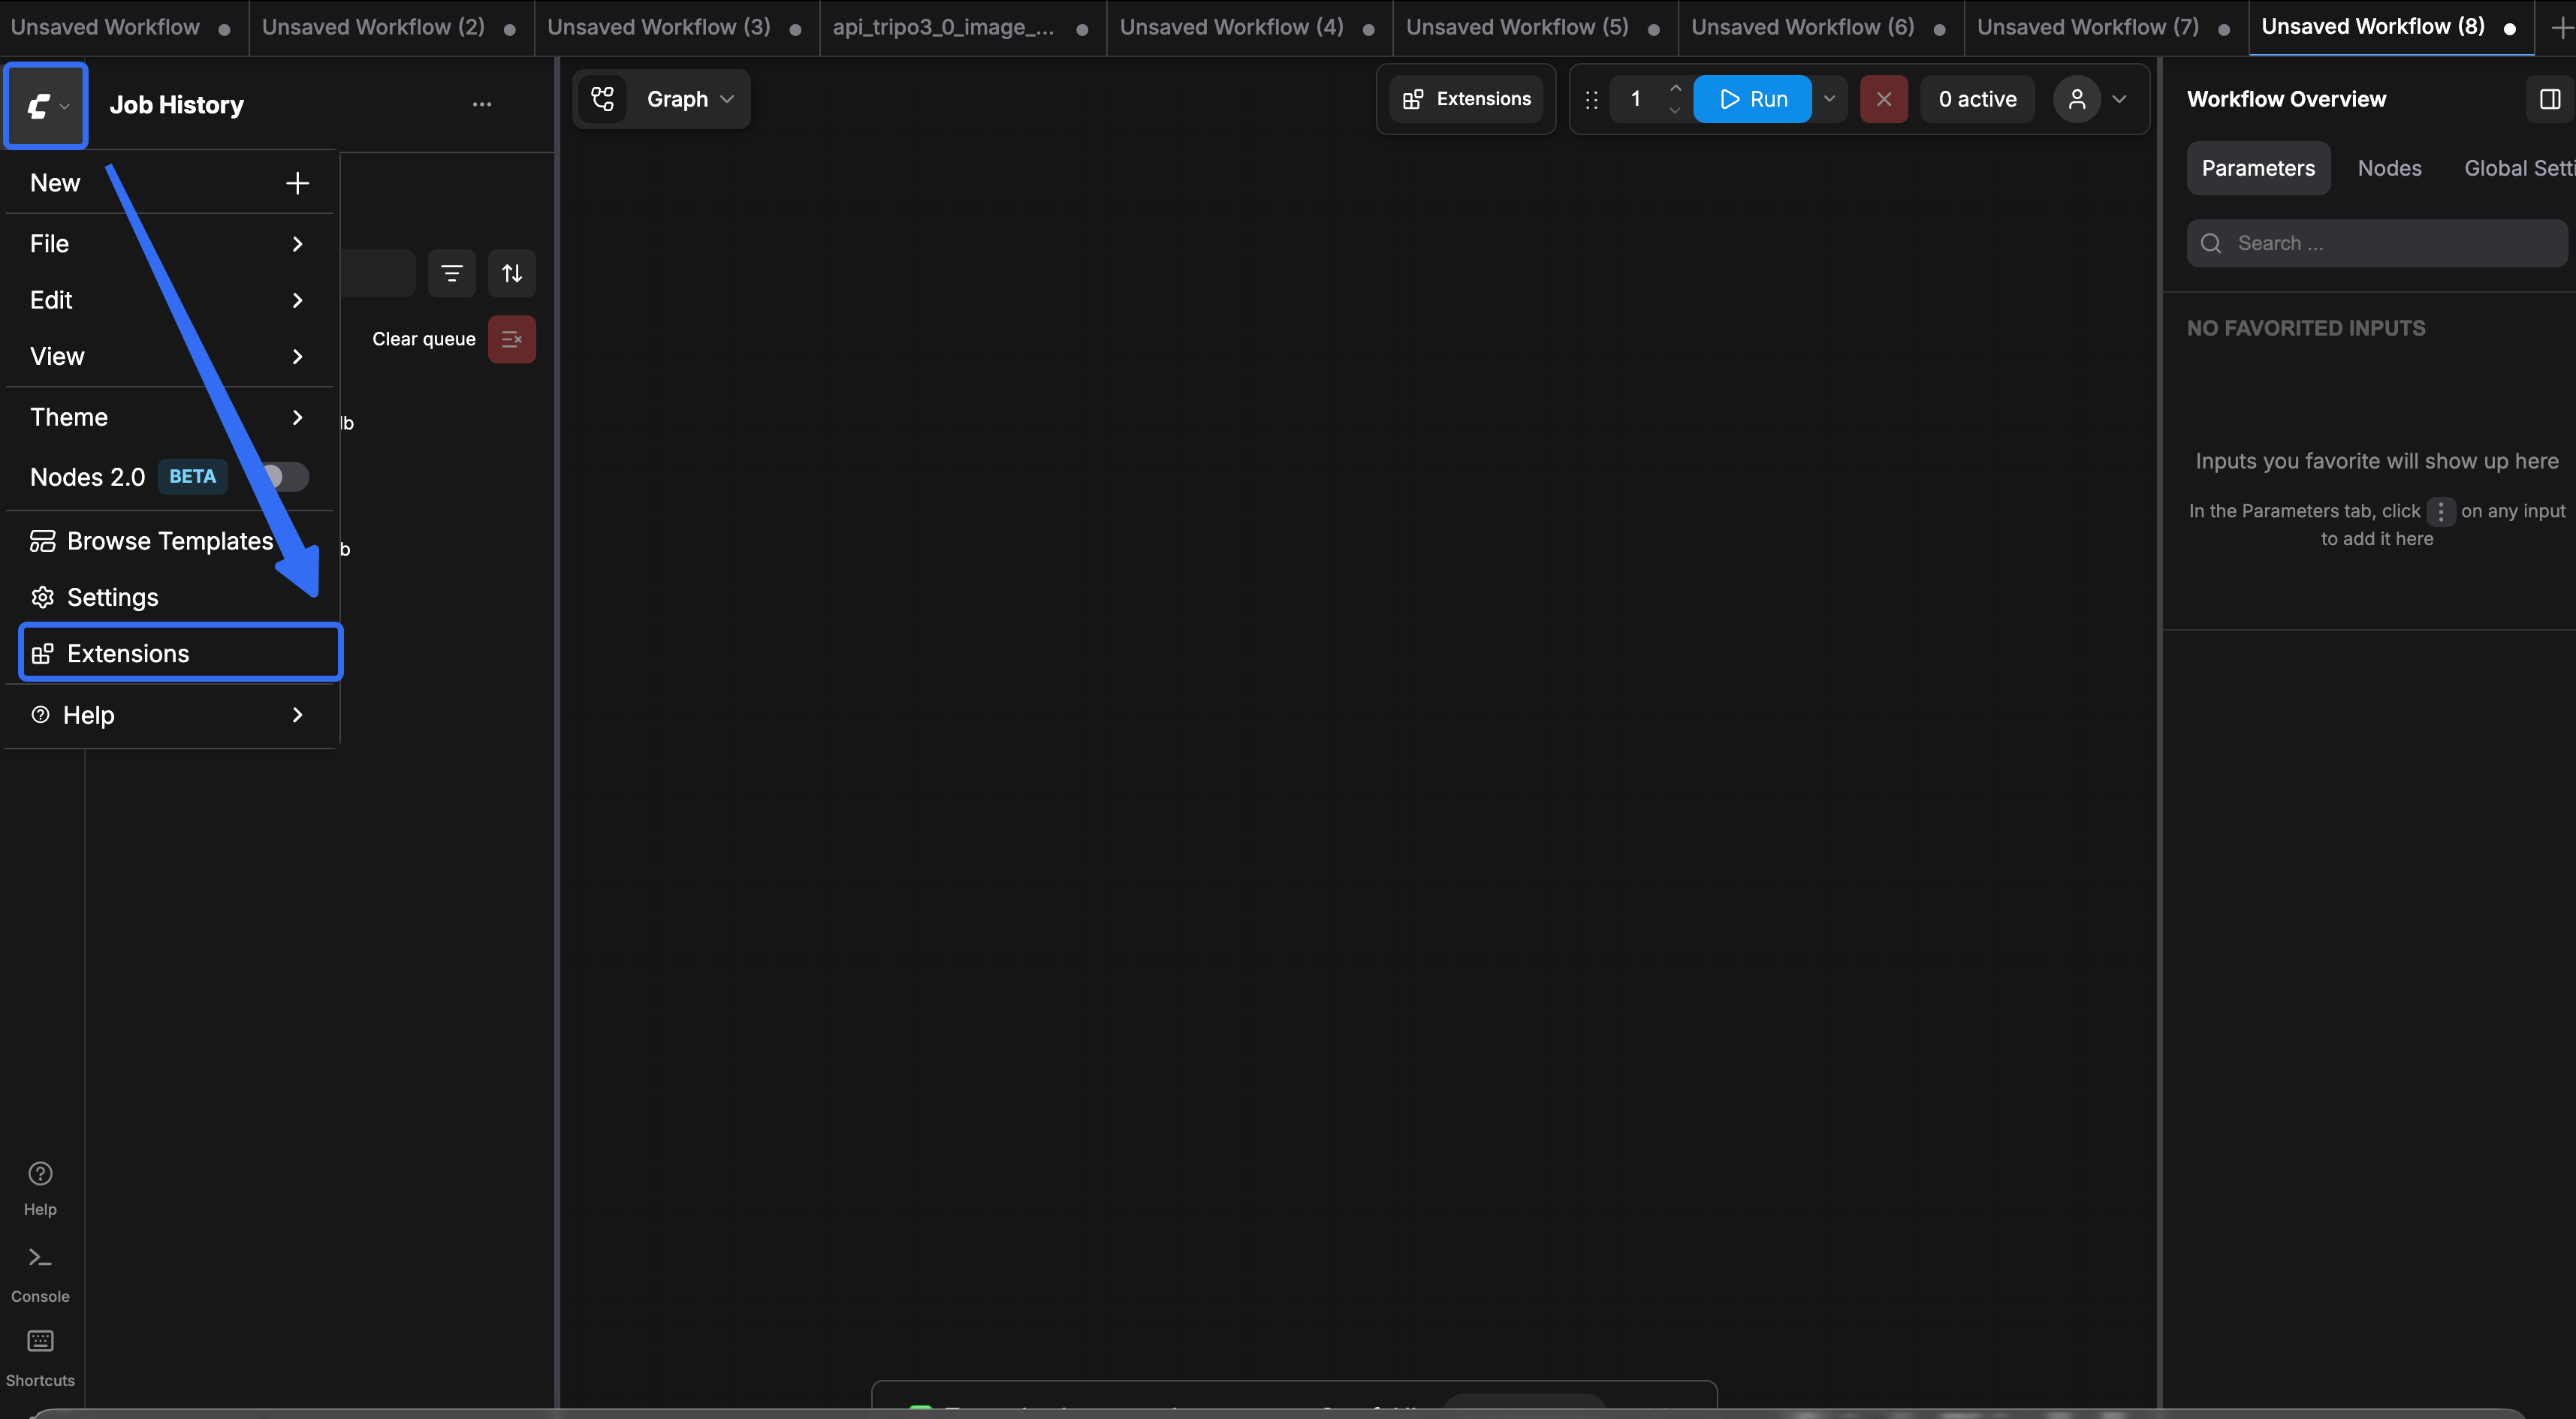
- Open ComfyUI and click the Extensions button to open the ComfyUI Nodes Manager panel.
- In the ComfyUI Manager panel, search for Hitem3D, and then click Install.
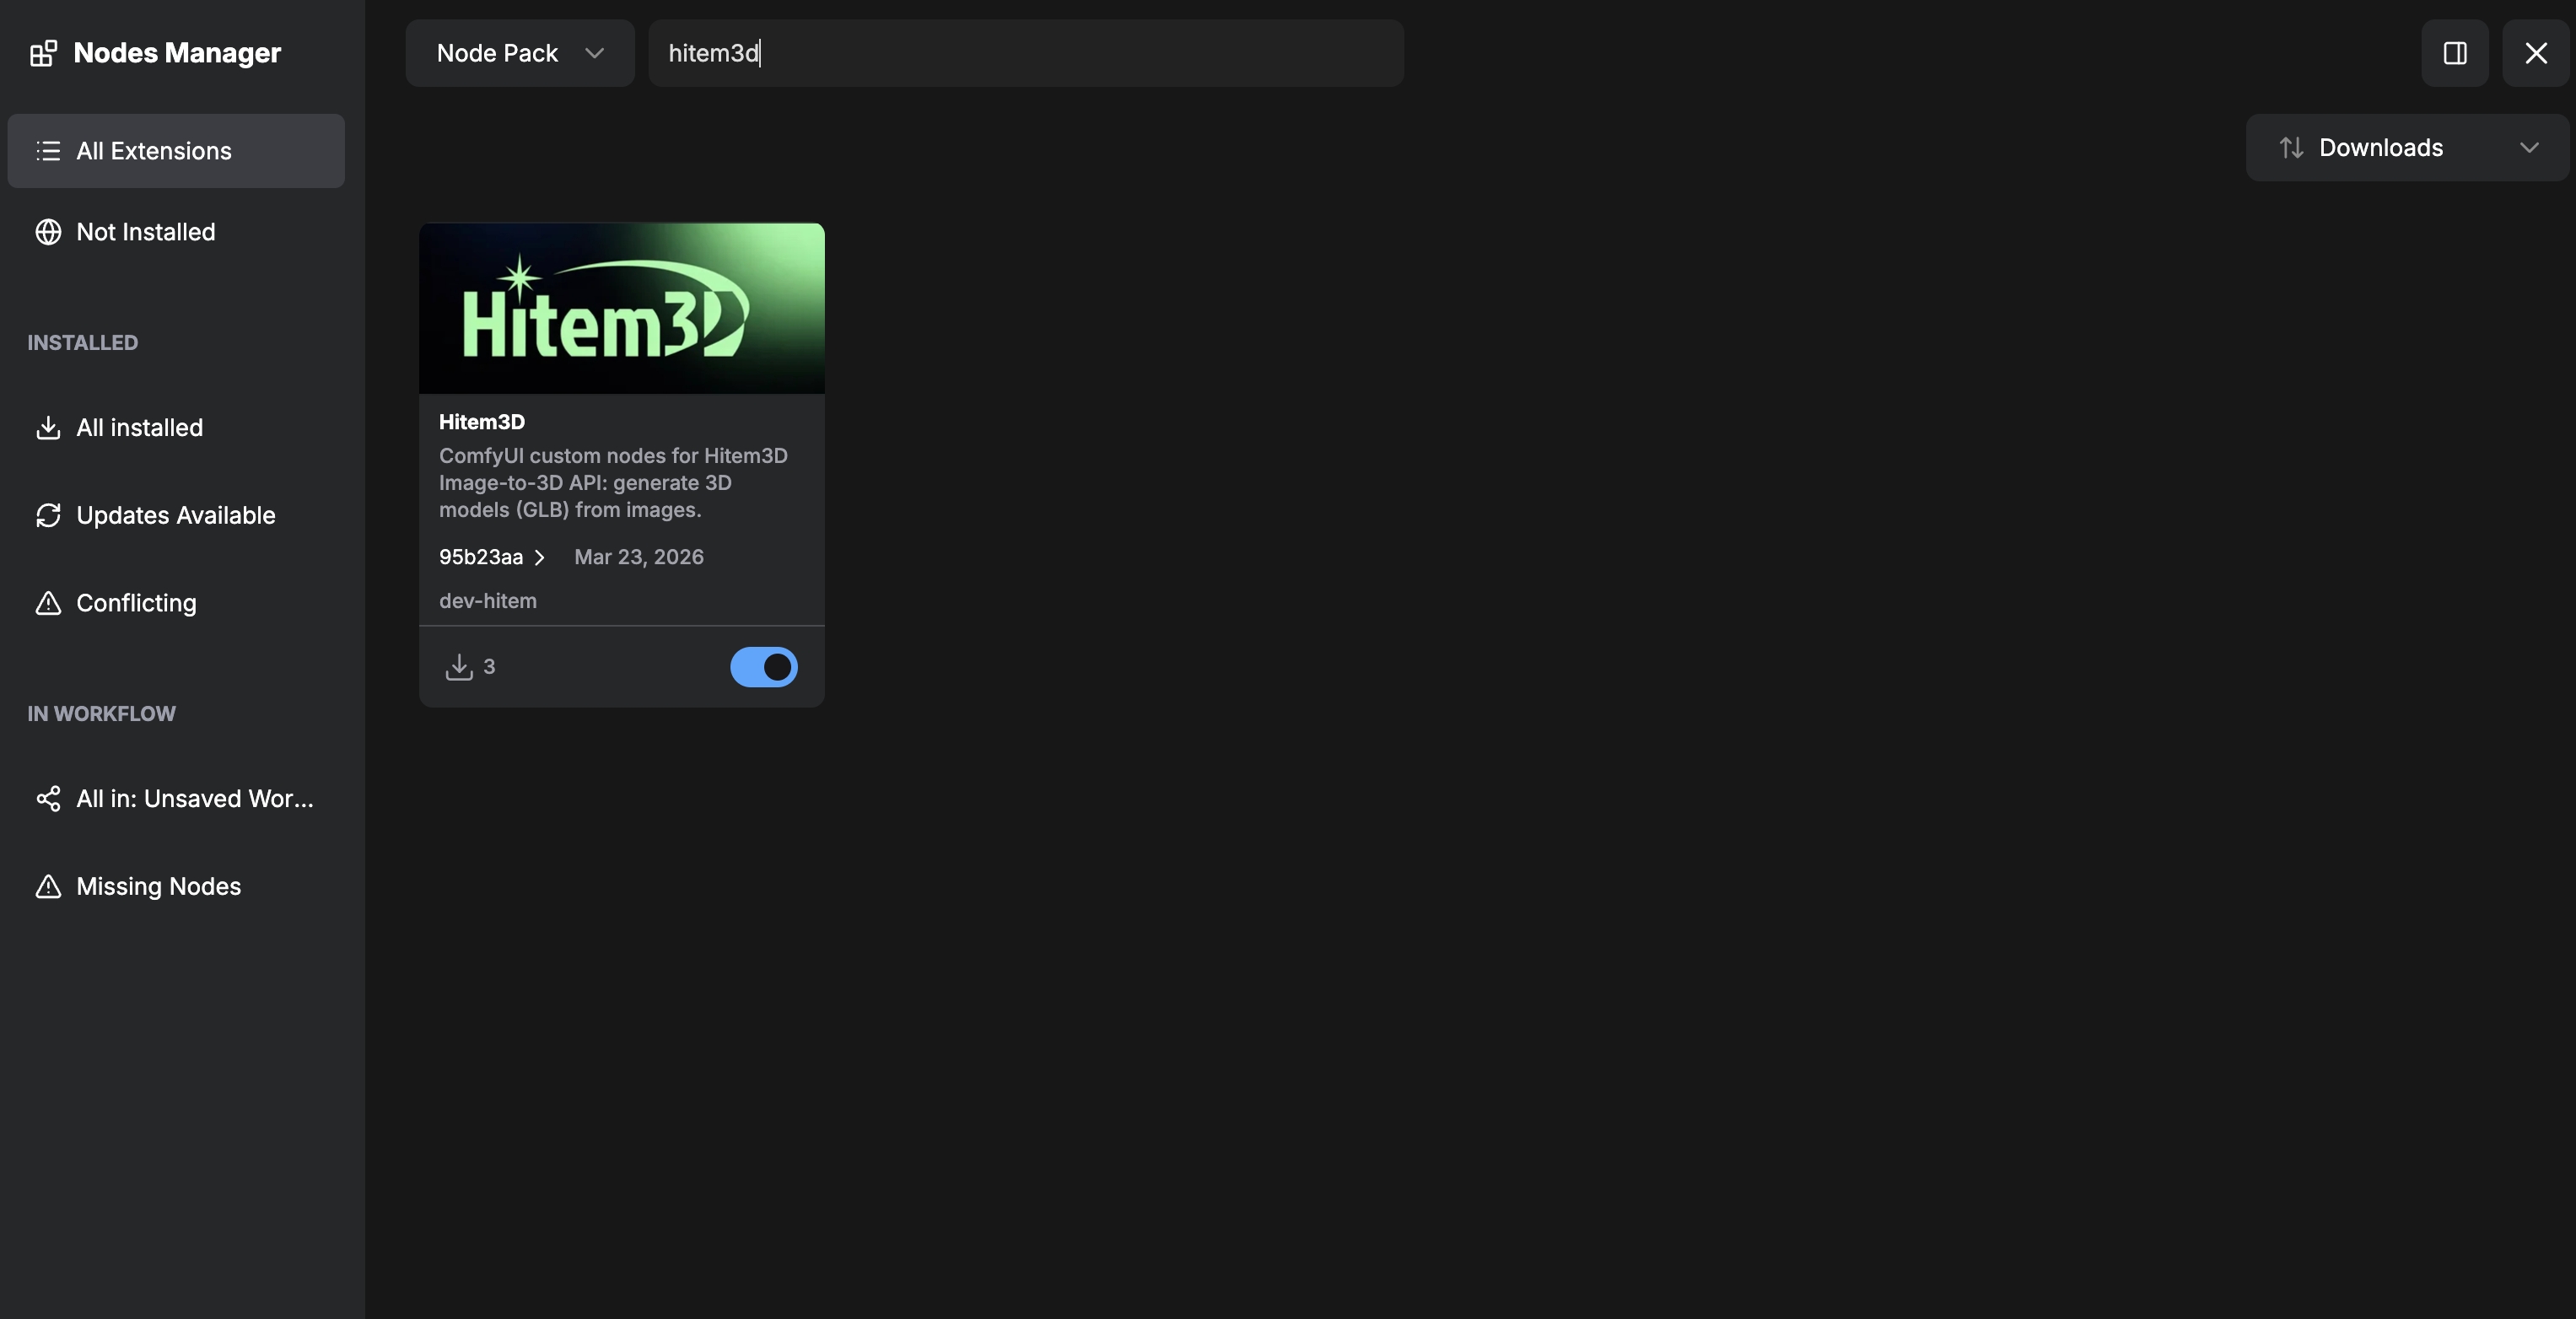
- Once installation is complete, restart ComfyUI — you should then be able to find the Hitem3D nodes in the node search panel.
Method 2: Manual Installation from the Hitem3D Website
If you prefer to manage plugins manually, follow these steps:
- Download the Plugin Package: Visit hitem3d.ai and download the
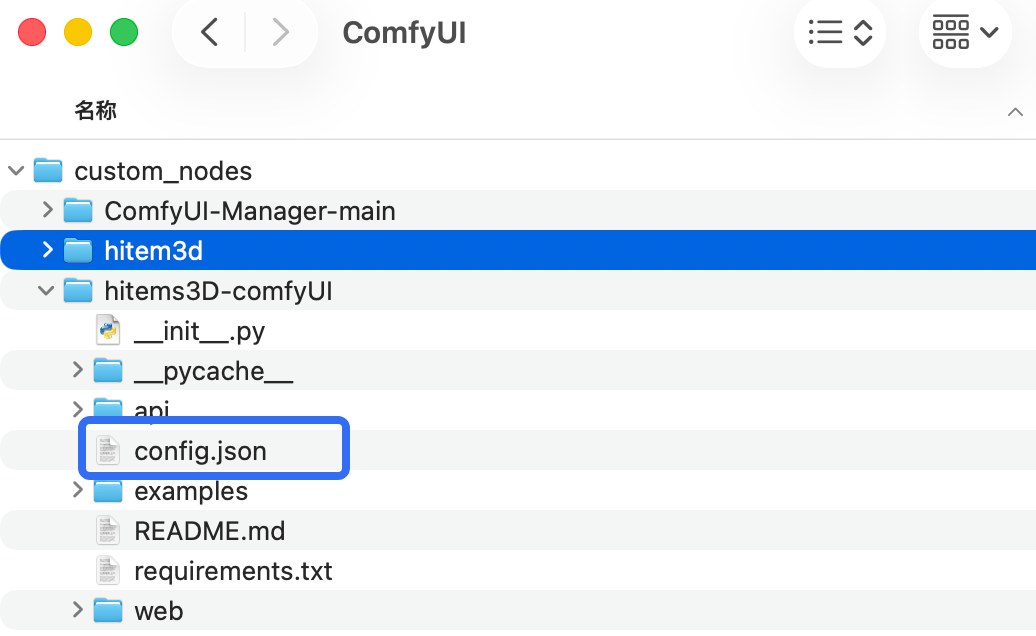
hitem3D-comfyUIarchive. - Extract to the Custom Nodes Directory: Unzip the package into your ComfyUI
custom_nodesfolder:
ComfyUI/custom_nodes/hitem3D-comfyUI
3. Install Python Dependencies: Open the ComfyUI built-in terminal (via ComfyUI Manager) or any terminal using the same Python environment, and run:
cd ComfyUI/custom_nodes/hitem3D-comfyUIpip install -r requirements.txt
How to Use the Hitem3D ComfyUI Plugin
Step 1: Authenticate with Your API Key
All Hitem3D nodes require a valid API Key to communicate with the cloud generation service.
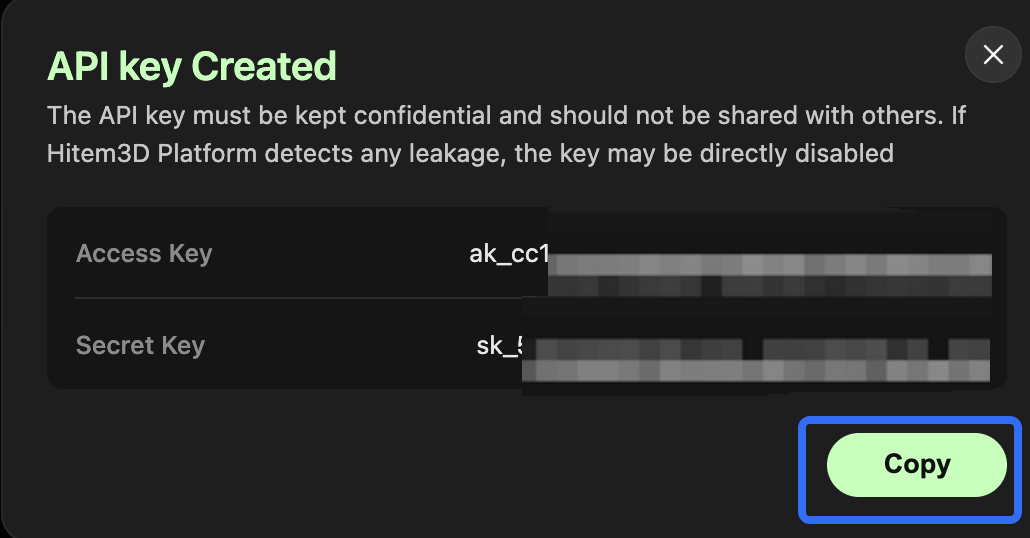
Log in to your Hitem3D account and navigate to the API Platform at platform.hitem3d.ai.
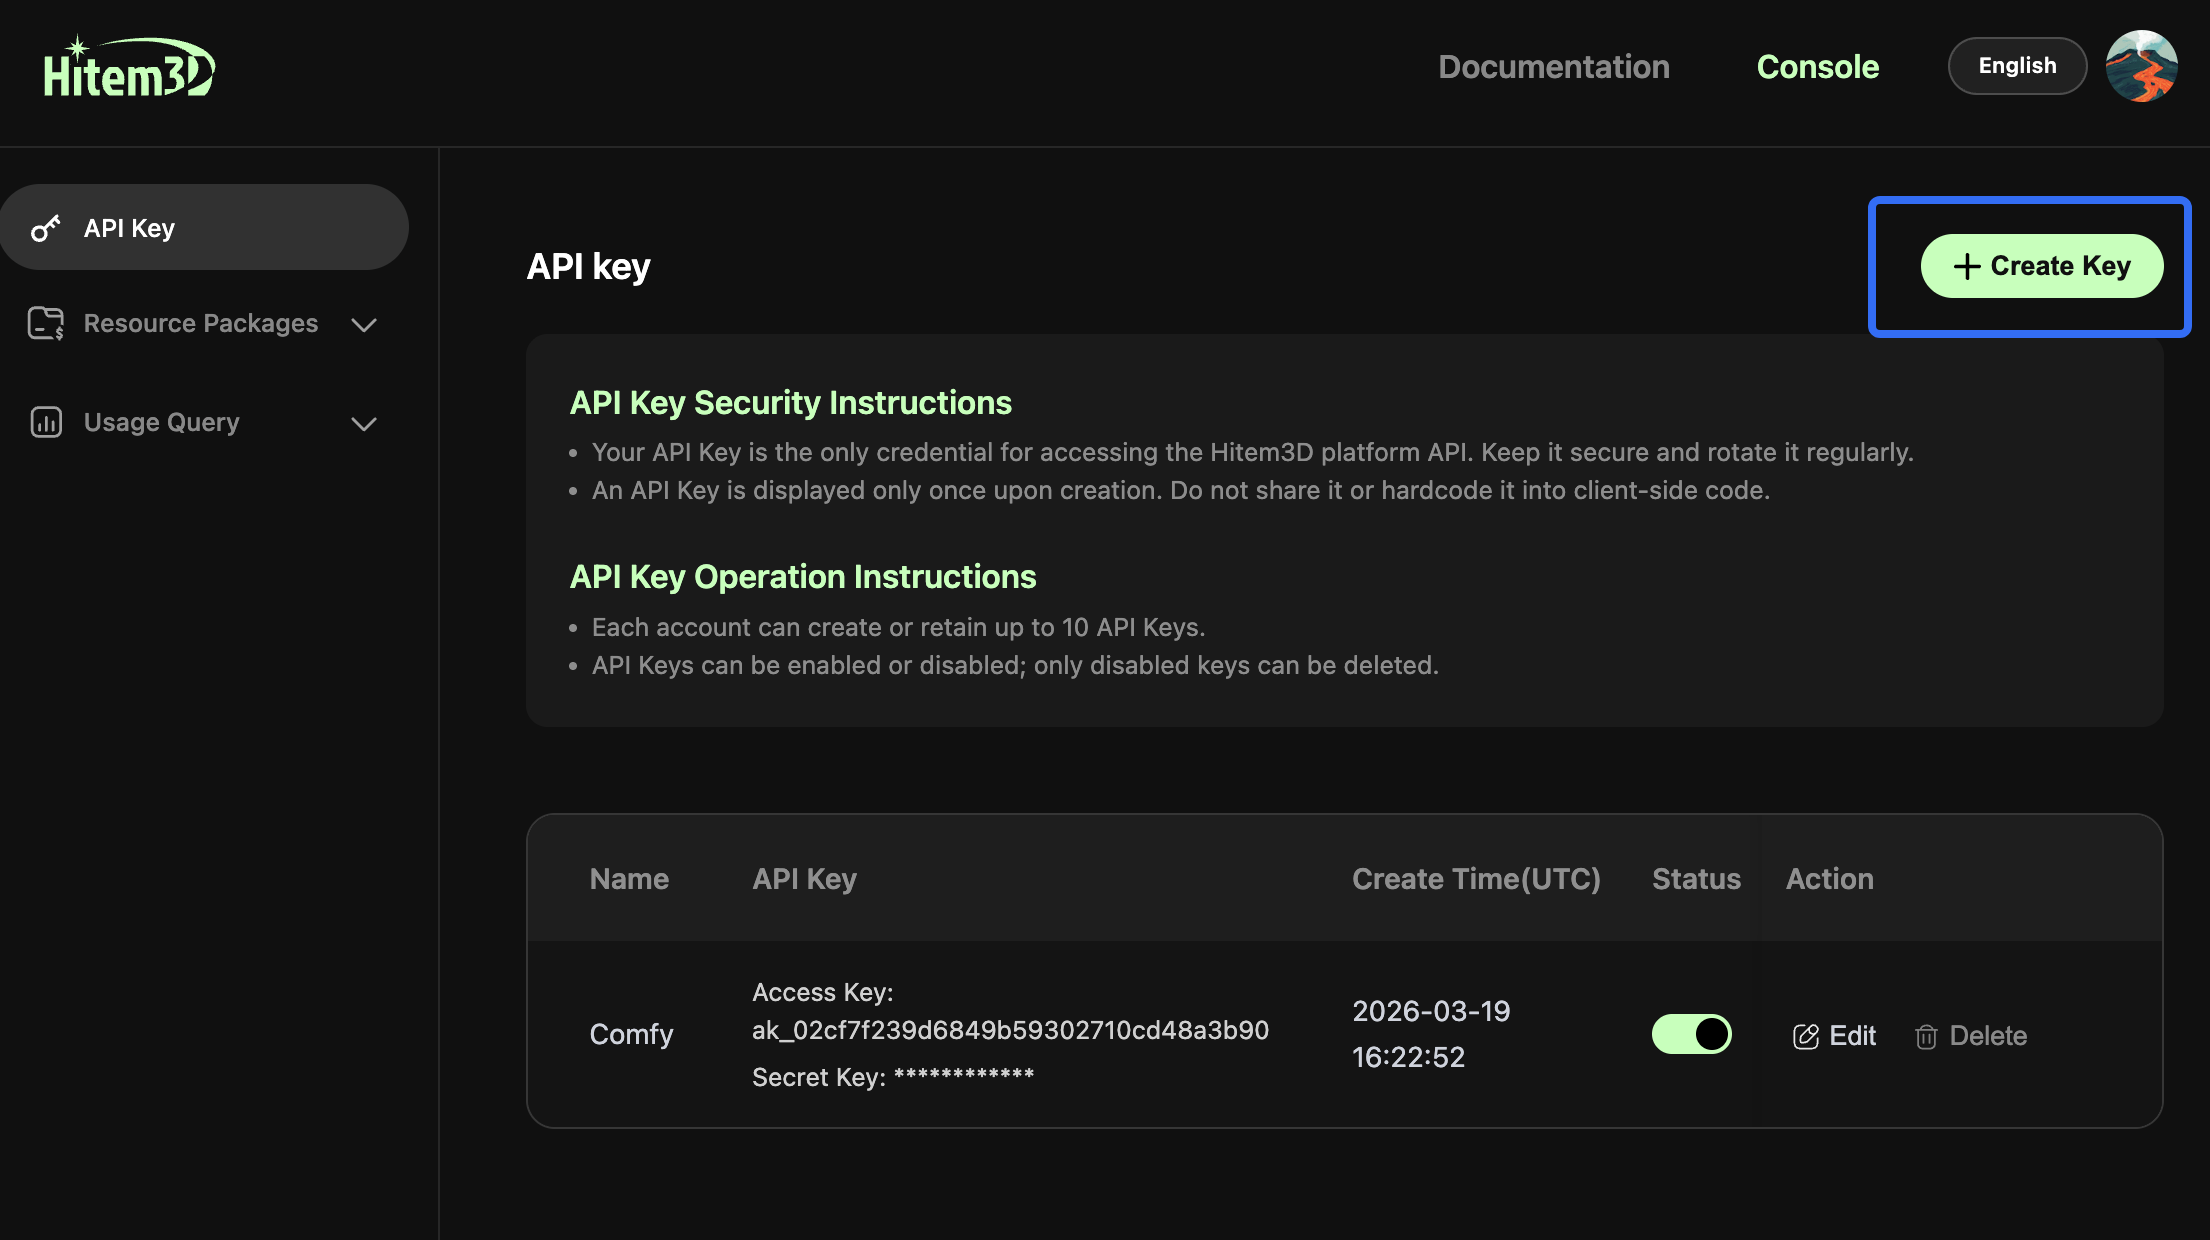
Click Create Key, give your key a name, and copy the generated API Key.
In ComfyUI, locate any Hitem3D node in your workflow and set up your API Key using either of the following two methods.
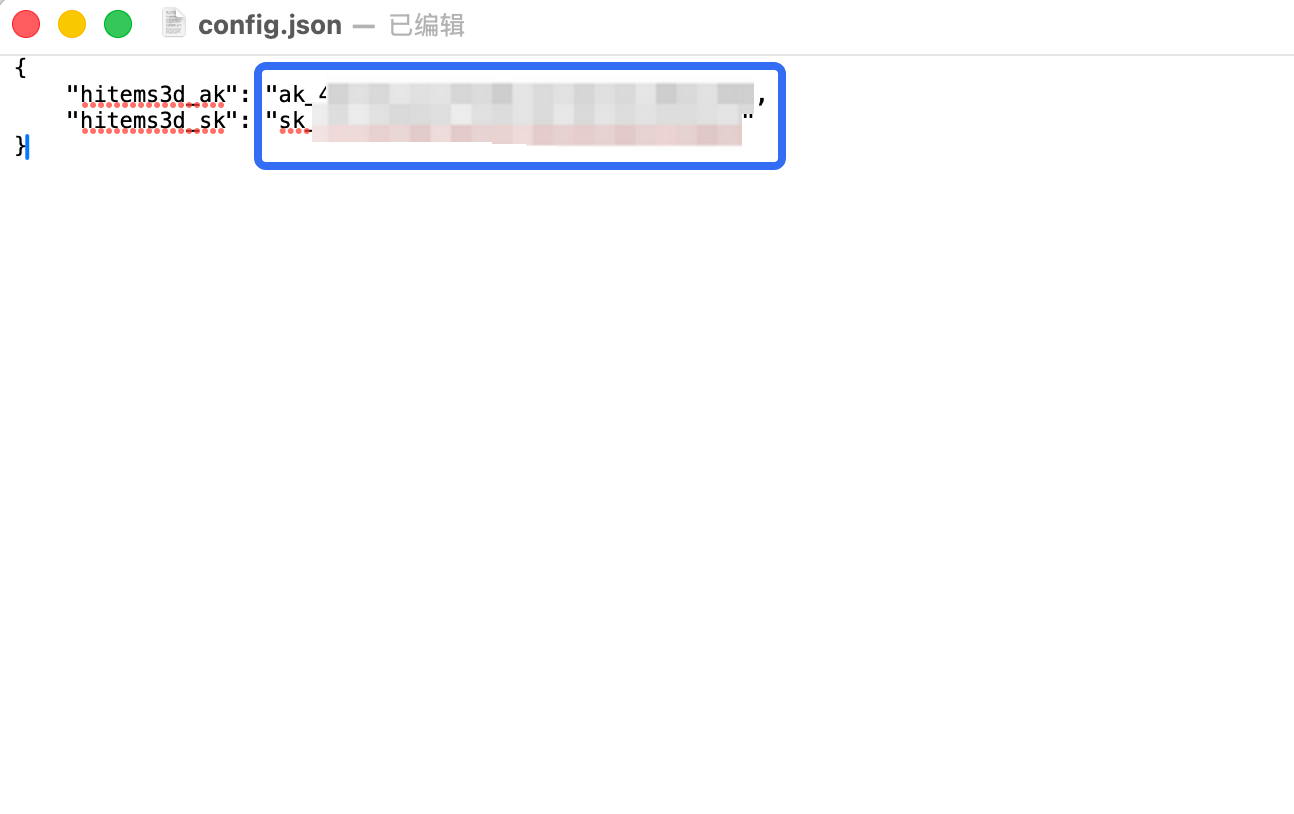
- Option 1: Save the API Key in a local JSON file (recommended). This allows ComfyUI to load your API Key automatically, so you won’t need to enter it manually each time you use the plugin.
- Option 2: Enter the API Key manually in ComfyUI.
Paste your API Key into the input field of any Hitem3D node during use to complete authentication.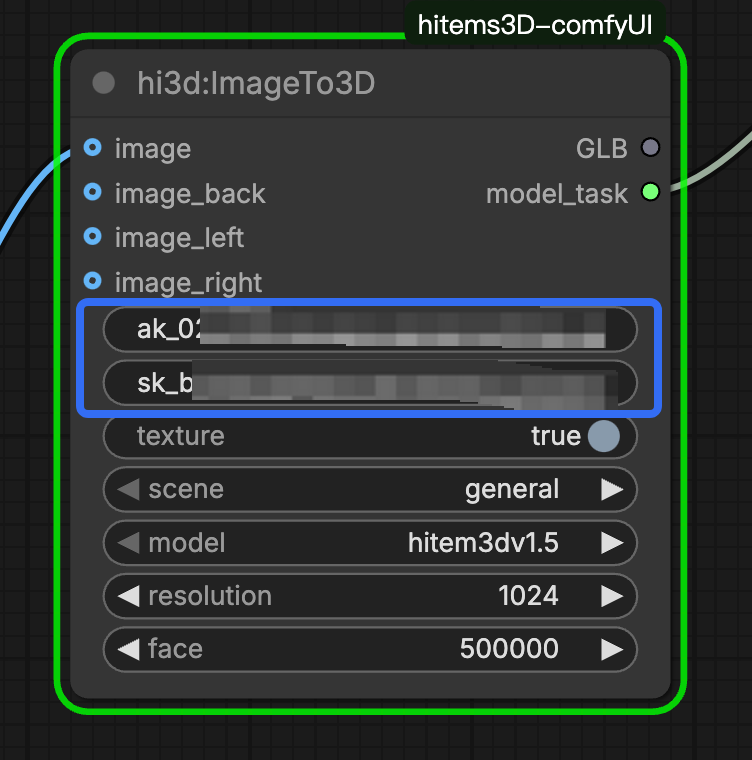
- Option 1: Save the API Key in a local JSON file (recommended). This allows ComfyUI to load your API Key automatically, so you won’t need to enter it manually each time you use the plugin.
Paste your API Key into the field to complete authentication.
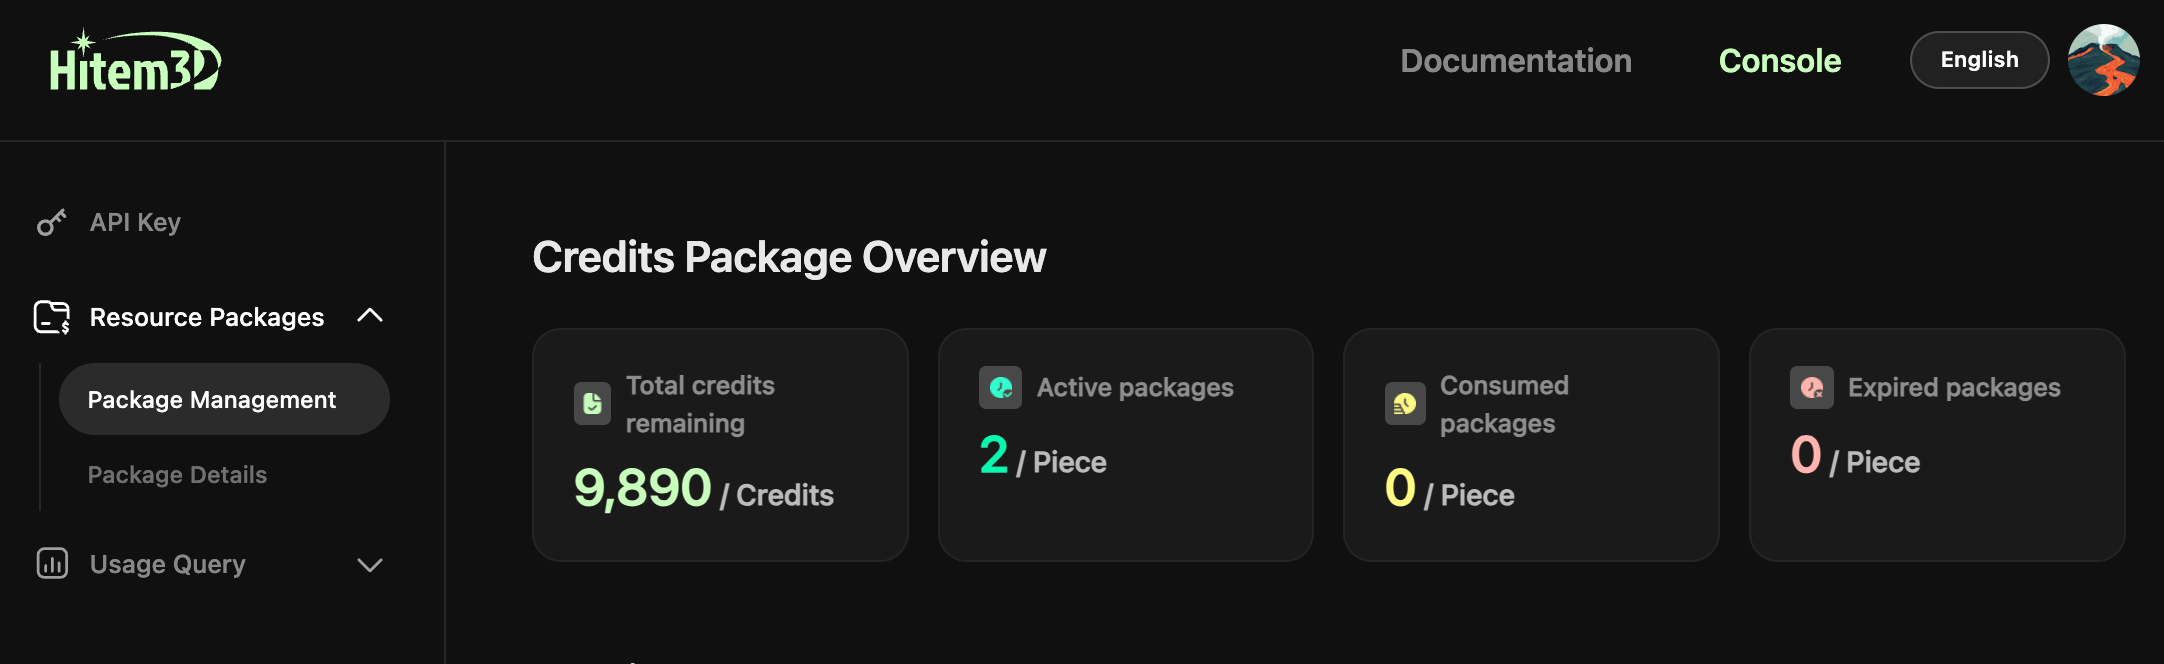
Note: The ComfyUI plugin consumes credits exclusively from your API credit package. Click Package Management in the API Platform to check your balance or purchase additional credits. New users can claim a free trial package upon first purchase.
Step 2: Build a Geometry Generation Workflow
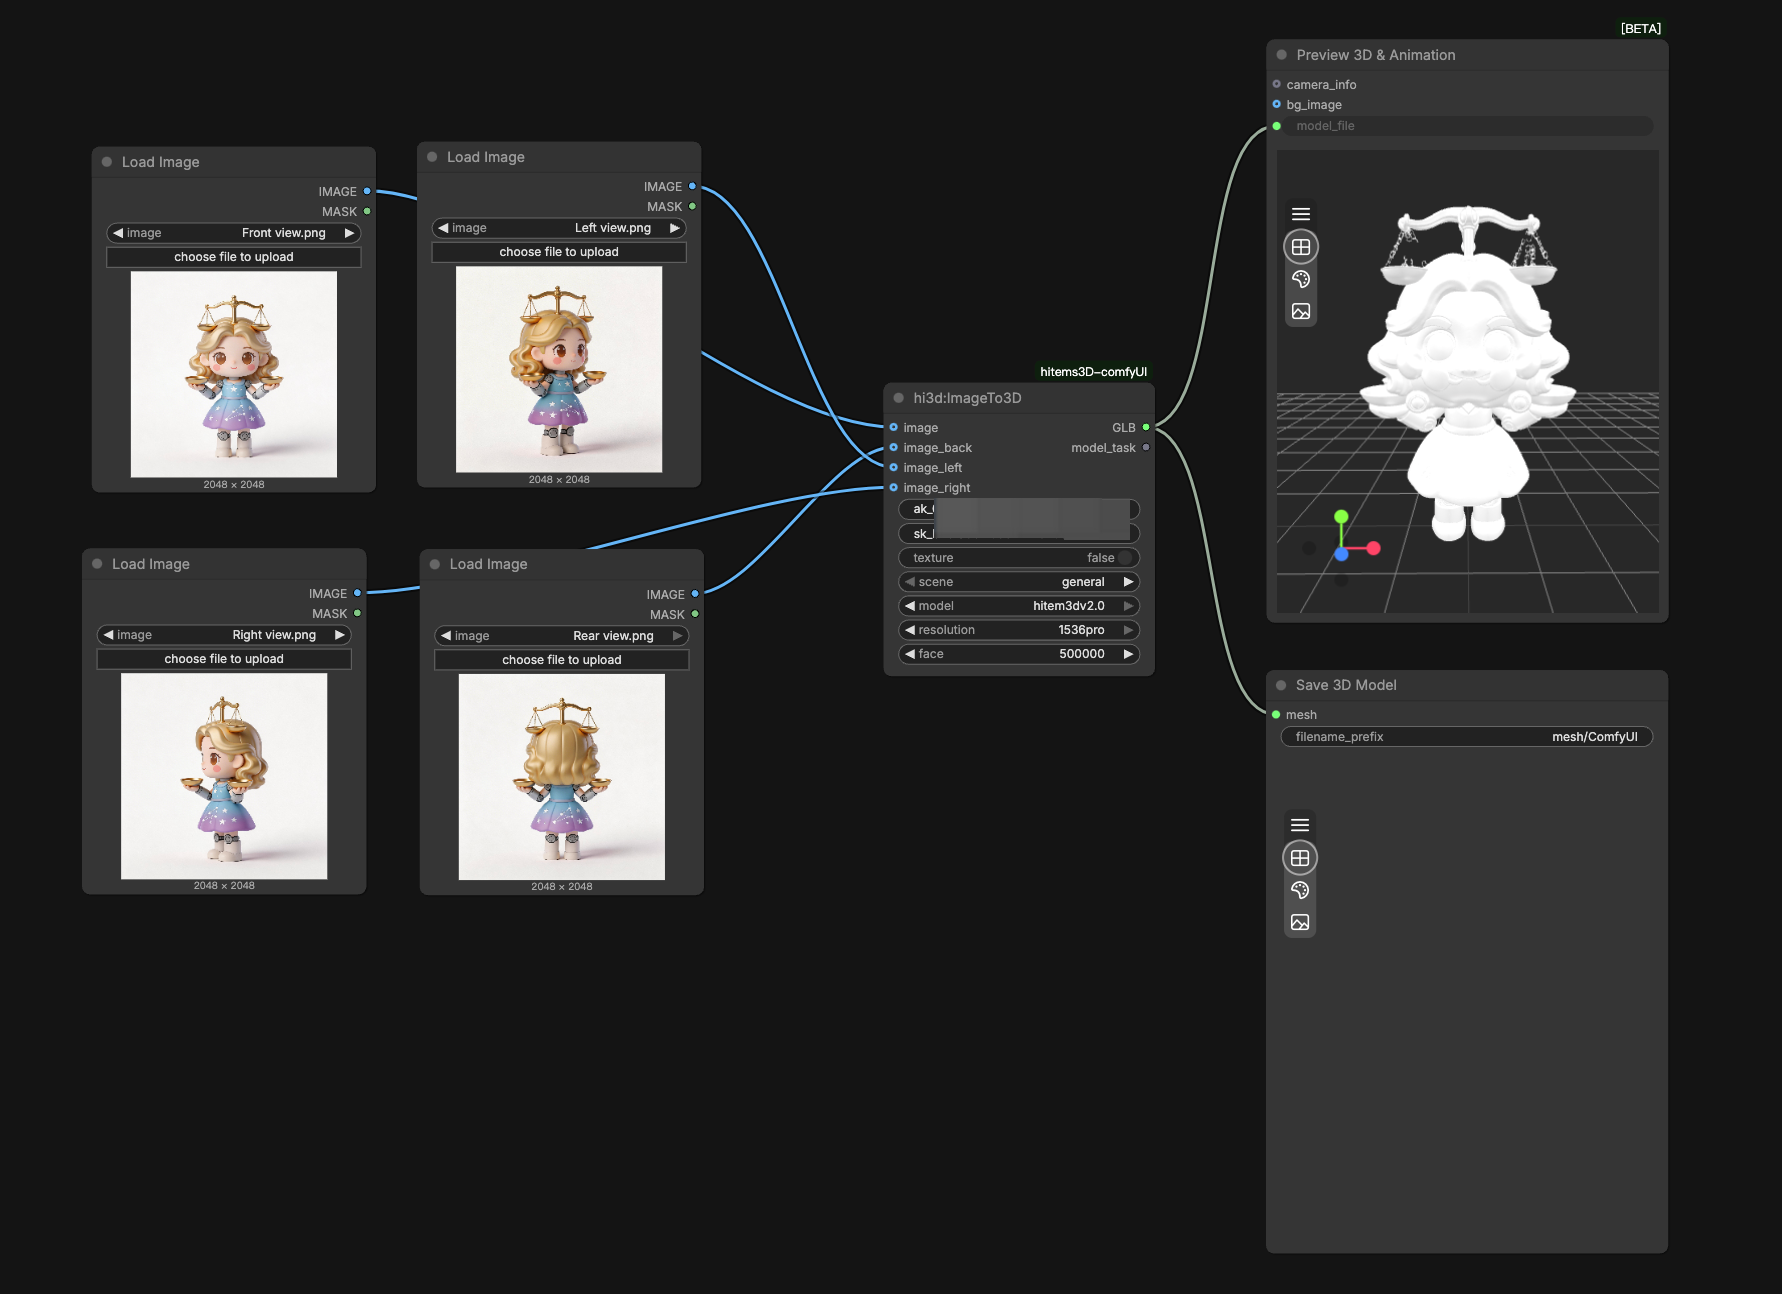
The geometry generation workflow follows a straightforward node path, as shown in the workflow diagram:
Start → Load Image Node → hi3d:ImageTo3D node → Save / Preview
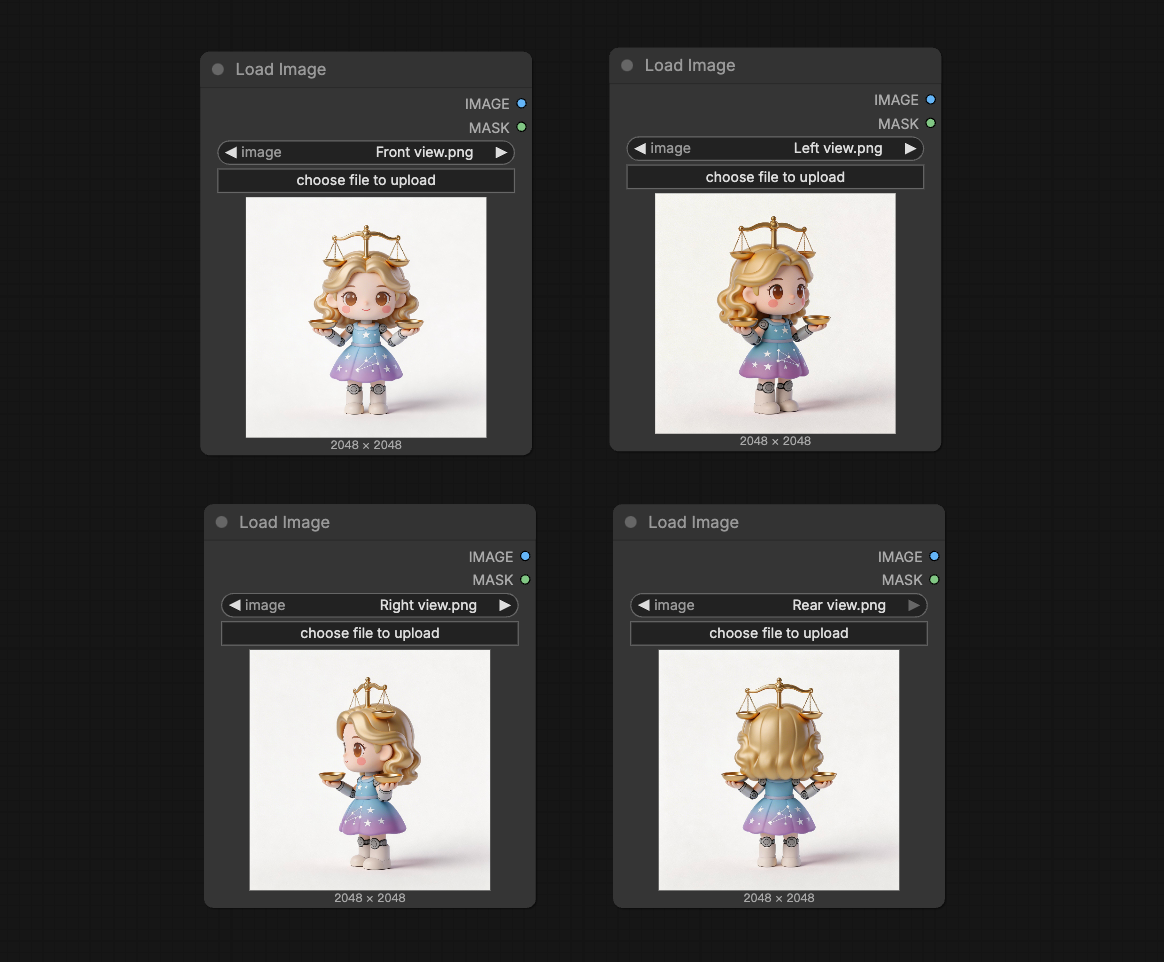
- Add a Load Image node by double-clicking anywhere on the canvas to open the node search menu, then search for and select Load Image. After that, upload your reference image. For multi-view generation, connect multiple image inputs.
- Connect the image output to the hi3d:ImageT03D node, then paste your API Key into the node’s API Key field to complete authentication.
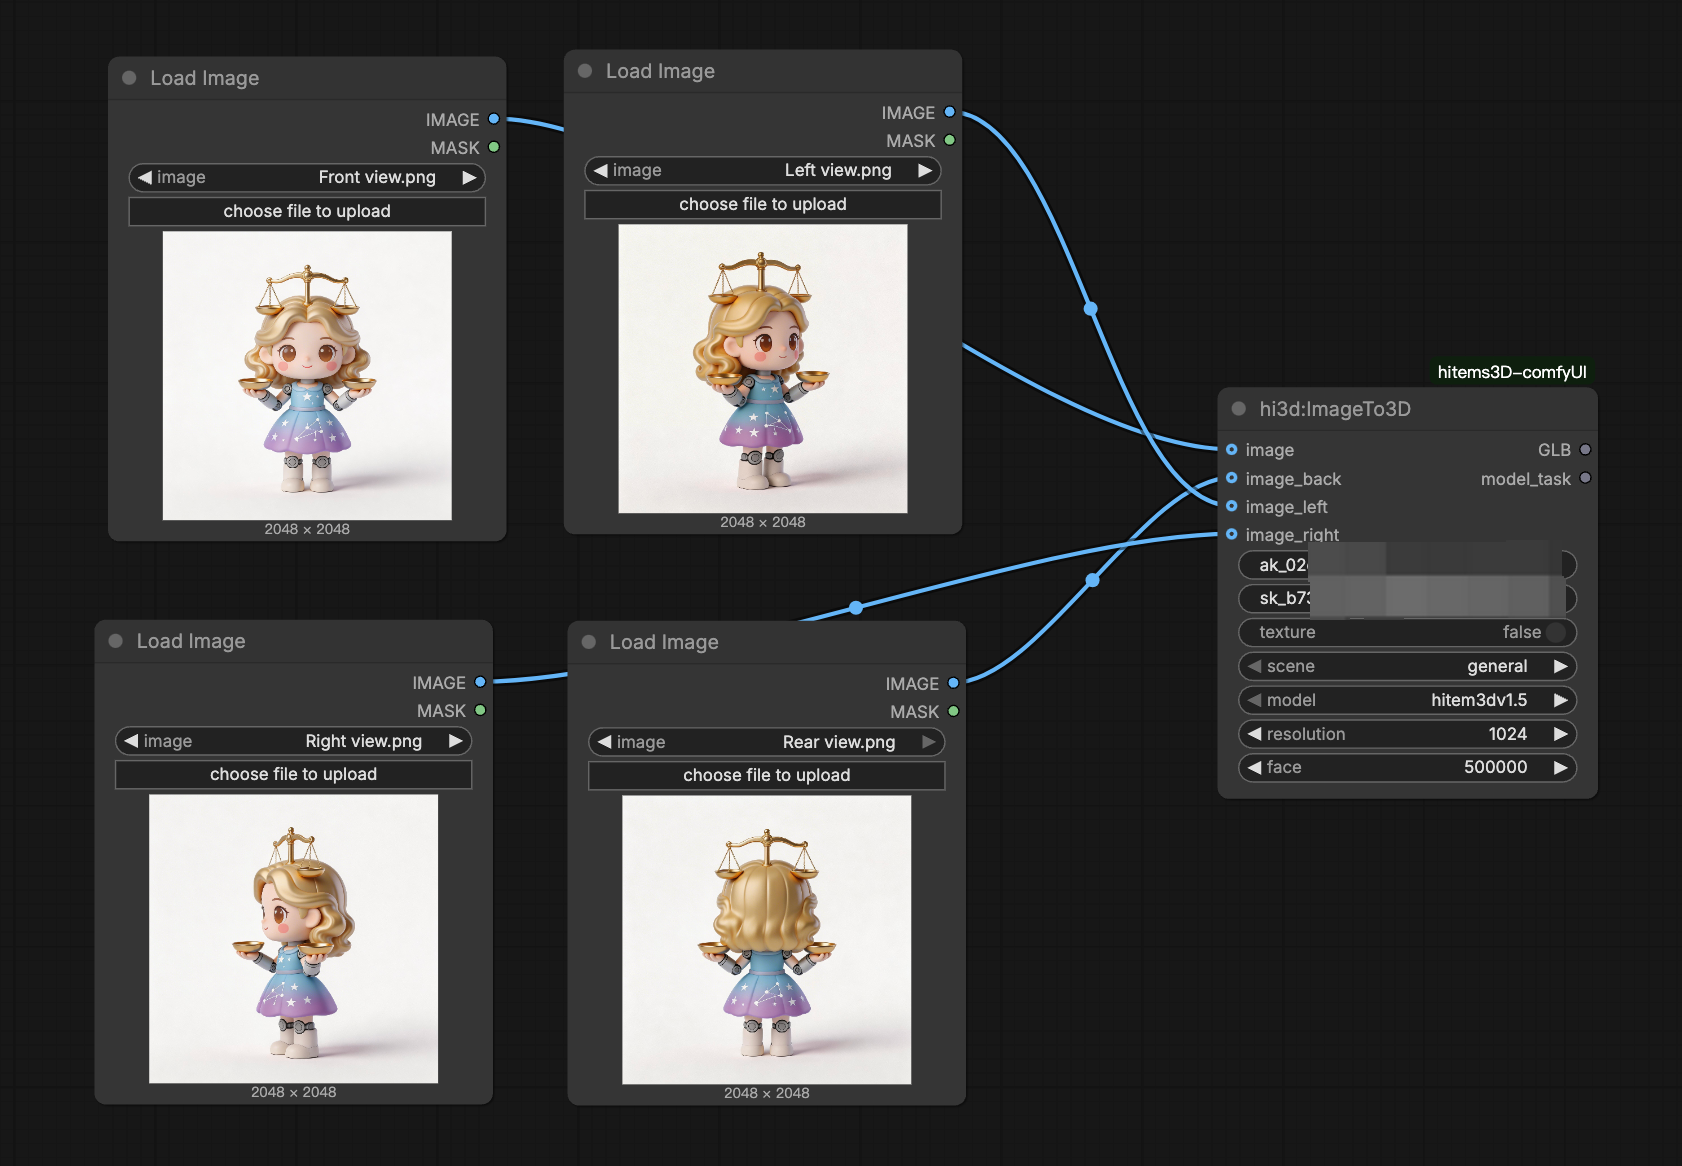
- Configure the generation parameters on the node:
| Parameter | Options |
|---|---|
| Scene | We offer two generation modes: General: Generates general-purpose 3D models for common objects and non-portrait subjects. Portrait: Generates 3D models optimized for human portraits and character-like subjects. |
| Model & Resolution | Multiple model versions and resolution options are available. Choose the appropriate settings based on your specific needs. General: v1.5-512, v1.5-1024, v1.5-1536, v1.5-1536pro, v2.0-1536, v2.0-1536pro Portrait: v1.5-1536, v2.0-1536pro, v2.1-1536pro |
| Face | Customize based on your needs. |
| Texture | You can choose True to generate textures based on your needs, which requires connecting the output to the hi3D:Texture node in the next step. Alternatively, choose False to generate geometry only. |
- Connect the output to a Save 3D Model node. Then click Run to generate the model. Once the workflow is complete, the model file will be automatically exported and saved to your local ComfyUI output folder.
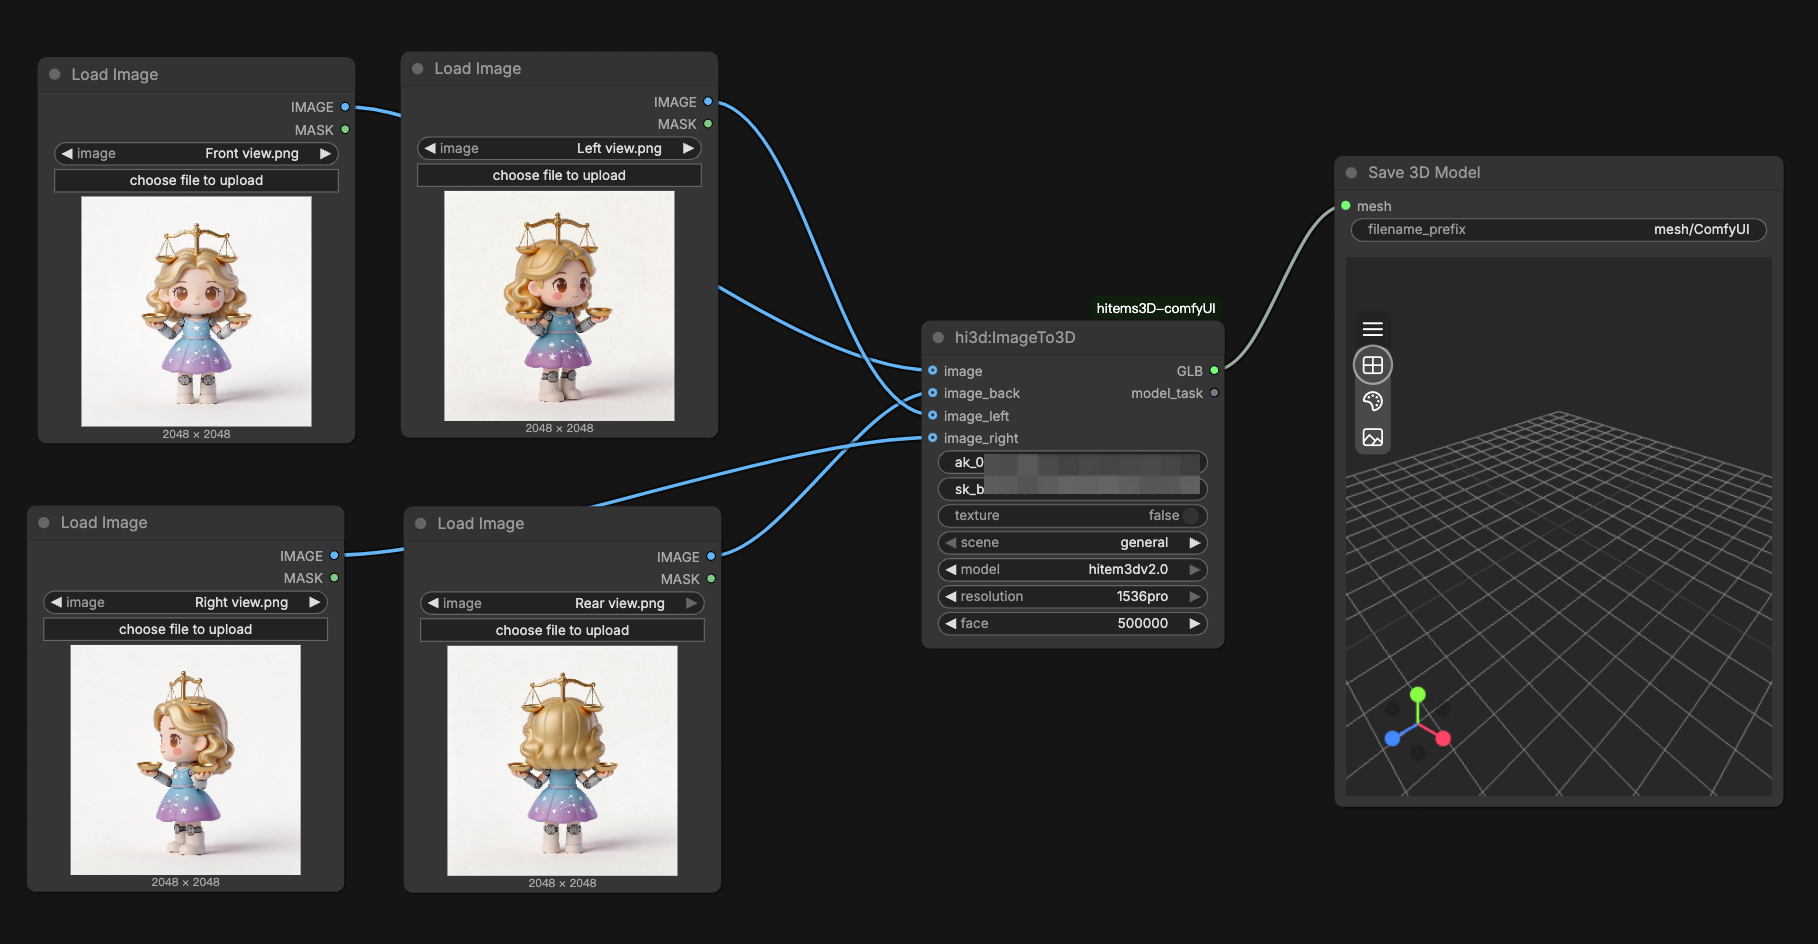
- Optionally, connect to a 3D Preview Node to visualize the result inline.
Pro Tip: Use clean, well-lit reference images with simple backgrounds for best geometry results. Providing multiple views of a complex object significantly improves structural accuracy.
Step 3: Generate Textures for Your Model
Texture generation can be run either as part of a one-click workflow or as a standalone stage after geometry is complete.
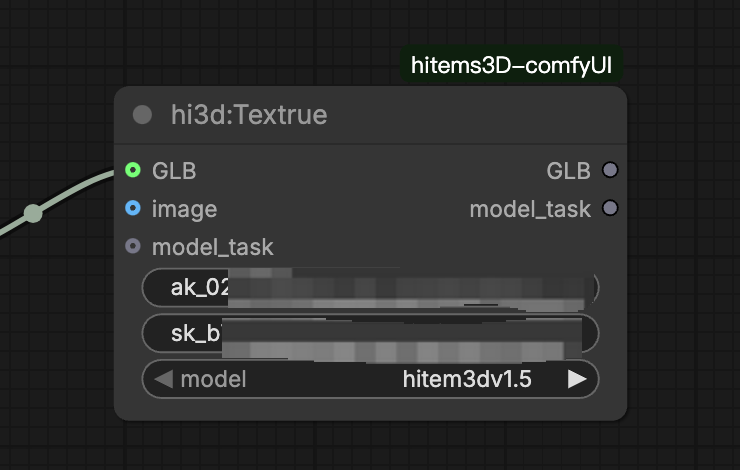
Staged Texture Workflow: Input Node (ImageTo3D or Load3DModel) → hi3DTexture Node → Save / Preview
- Add the hi3D:Texture node to your workflow, then paste your API Key into the node’s API Key field.
- Connect either the geometry output from
hi3D:ImageTo3Dor ahi3D:Load3DModelnode to thehi3D:Texturenode, depending on how you want to generate textures.- Option 1: Use the geometry output from hi3D:ImageTo3D
- If you want to generate textures based on the original input image, set Texture to true in the hi3D:ImageTo3D node. No extra hi3D:Texture node is required — the textured result will be output directly.
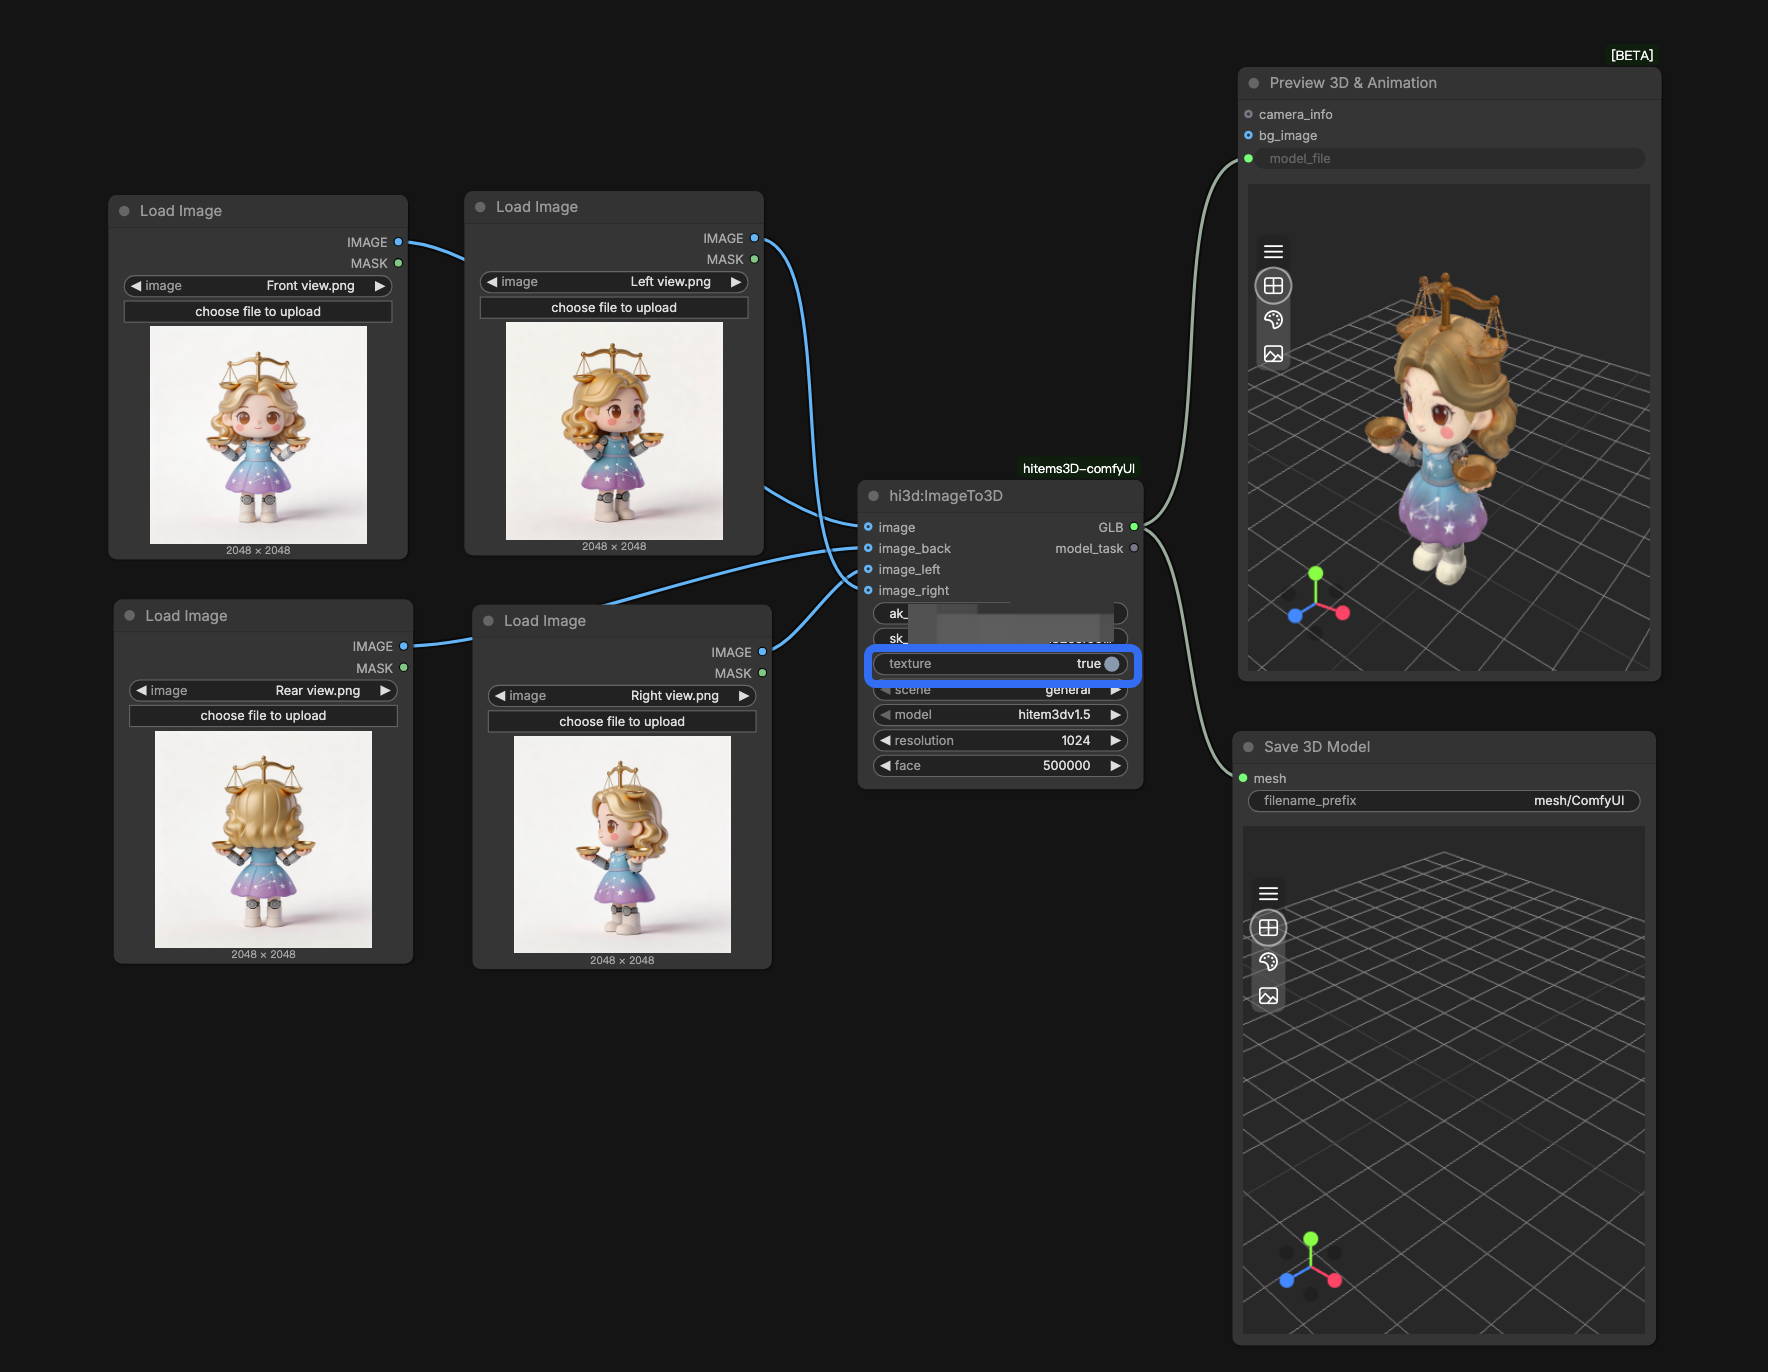
- If you want to generate textures based on the original input image, set Texture to true in the hi3D:ImageTo3D node. No extra hi3D:Texture node is required — the textured result will be output directly.
- Option 1: Use the geometry output from hi3D:ImageTo3D
If you want to generate a different texture, add a
Load Imagenode and connect it tohi3D:Textureas the texture input. In this case, set Texture to false in thehi3D:ImageTo3Dnode.
Tips: Connect the
ImageTo3DandTexturenodes throughmodel_task. There is no need to enter AK and SK again.- Option2: Use a hi3D:Load3DModel node
If you want to texture an existing 3D model, add a
hi3D:Load3DModelnode and connect it tohi3D:Texture. Then add a Load Image node, upload your texture image, and connect it tohi3D:Textureas the texture input.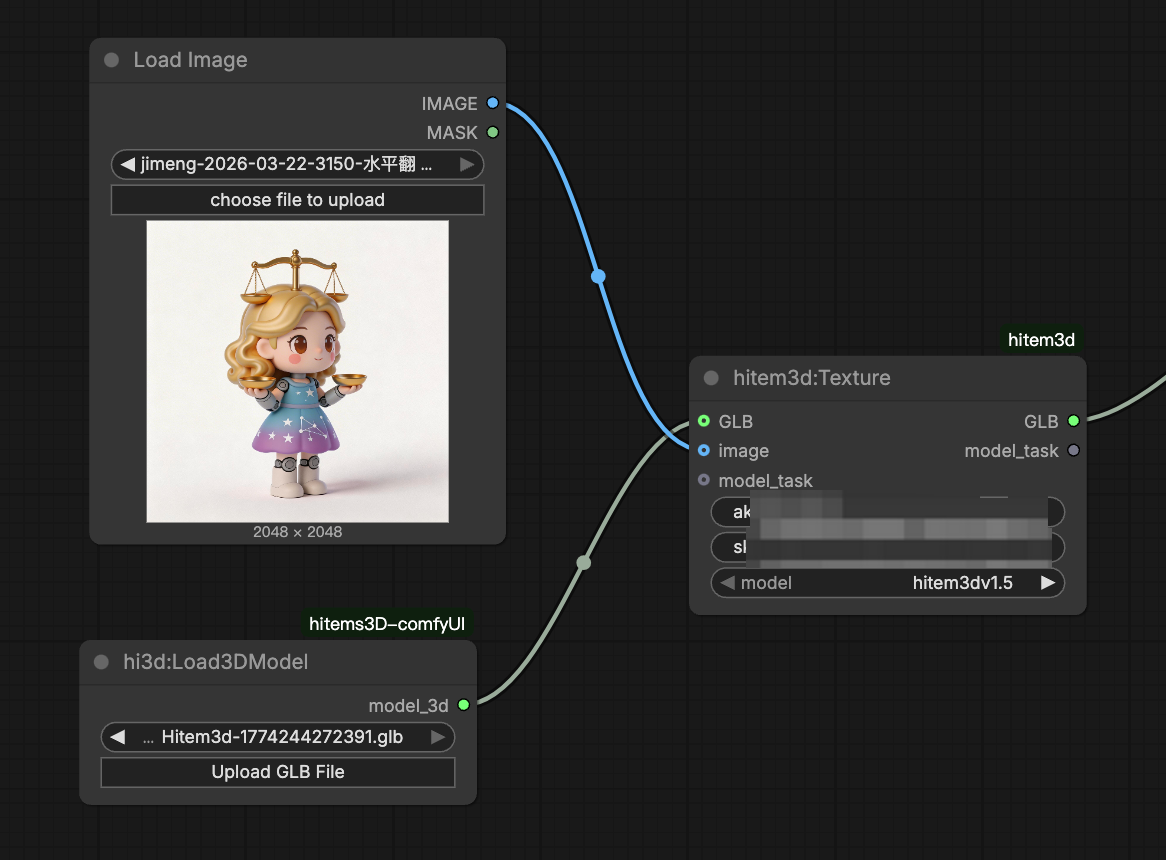
- Set the texture generation version (hitem3dv1.5 or scene-portraitv1.5) and enable PBR if needed.
- Run the workflow. The textured model will be saved to your output directory.
One-click Generation: To generate geometry and texture in a single pass, connect the IMG TO 3D node’s output directly into the Texture node before saving. This streamlines the pipeline for faster iteration.
Step 4: Save and Export Your Model
Once generation is complete, your model is automatically saved to the ComfyUI default output path. To organize your outputs: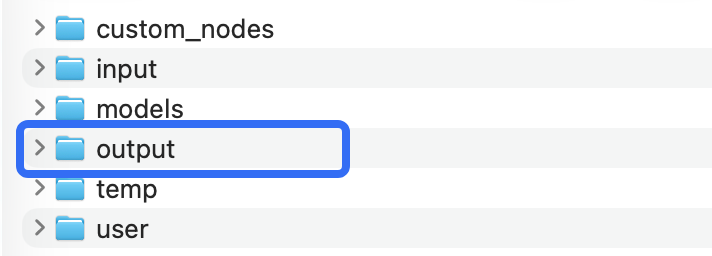
- Use the Save Node configuration to specify a custom subfolder or filename for each generation task.
- The supported export formats is GLB — select the format that best suits your downstream application.
Advanced Tips for Better Results
Optimizing Your Input Images
The quality of your input directly impacts the quality of the generated geometry. Use high-resolution images with clear subject isolation and good lighting. For characters or portraits, the portrait model type is specifically optimized for human-like subjects and will produce cleaner topology compared to the general model.
Choosing the Right Model Version
Higher-resolution versions (1536pro) preserve finer surface detail but consume more credits and take longer to process. For rapid prototyping or concept validation, starting with v1.5-512 or v1.5-1024 is a practical approach before committing to a high-resolution final pass.
Building Reusable Workflow Templates
One of ComfyUI’s core strengths is the ability to save and share workflows. Once you’ve configured your Hitem3D node setup, save it as a workflow JSON file so your team can reuse it without reconfiguring parameters each time.
Troubleshooting Common Issues
Nodes not appearing after installation
Confirm the plugin folder is placed correctly inside custom_nodes and that ComfyUI was fully restarted. Check the ComfyUI terminal for any import errors related to the plugin.
Generation fails or returns an error
Verify that your API Key is entered correctly and that your API credit balance is sufficient. Ensure your internet connection is stable during generation, as the plugin communicates with Hitem3D’s cloud service.
Model output is missing or not saving
Check that your ComfyUI output directory has write permissions. If you’ve specified a custom save path, confirm the path exists and is accessible.
Low-quality geometry results
Try using a cleaner reference image with a simpler background. Switching to a higher-resolution model version or providing additional views can also significantly improve output quality.
FAQ
Can I use Hitem3D-generated models for 3D printing?
Yes. Hitem3D currently supports GLB export only. If you want to use a generated model for 3D printing, you’ll need to first convert the GLB file into a 3D-printing-compatible format and make any necessary mesh adjustments before production.
Is the plugin free to use?
The plugin itself is free to download and install. Generation tasks consume credits from your API credit package.
What output formats are supported? The plugin supports GLB output format.
Can I texture models that weren’t generated by Hitem3D?
Yes. The Hitem3D Texture node accepts any compatible mesh input, including models loaded from local files, so you can apply AI-generated textures to existing geometry.
Does the plugin support multi-view input?
Yes. Both the General and Portrait model types support multi-view input for improved structural accuracy on complex subjects.
Conclusion: Bring AI 3D Generation into Your ComfyUI Pipeline
The Hitem3D ComfyUI Plugin gives technical creators and developers a powerful, flexible way to integrate AI-powered 3D generation into their existing node-based workflows. From single-image geometry generation to staged texturing and multi-format export, every step of the process is accessible as a native ComfyUI node.
Download the plugin today and start building smarter 3D pipelines with Hitem3D.