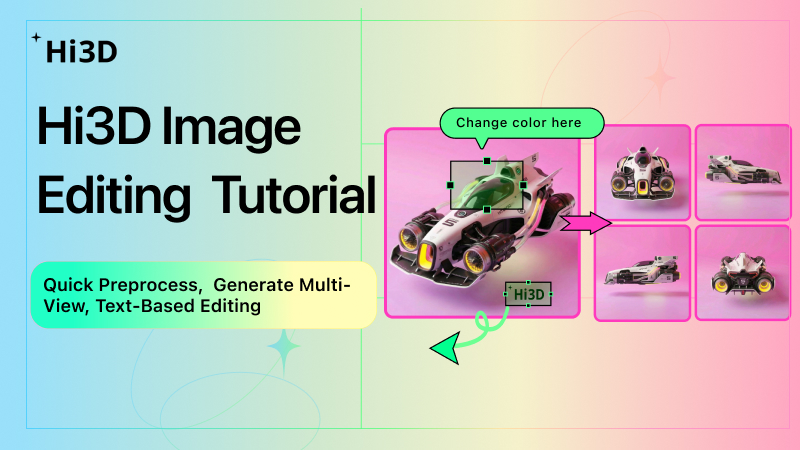
I. Feature Overview: The “One-Stop Preprocessing Workbench” Before 2D-to-3D
Hi3D’s newly upgraded built-in image editing functionality breaks through the limitations of traditional “single-image direct output” for 2D-to-3D conversion. It creates a complete workflow of “multiple model selection + multi-reference images + text editing + automatic multi-view generation.” This allows you to optimize your materials and generate multi-views directly within the platform, eliminating the need to switch between external software. The result is significantly improved 3D model fidelity and creative efficiency.
II. Step-by-Step Tutorial for All Features
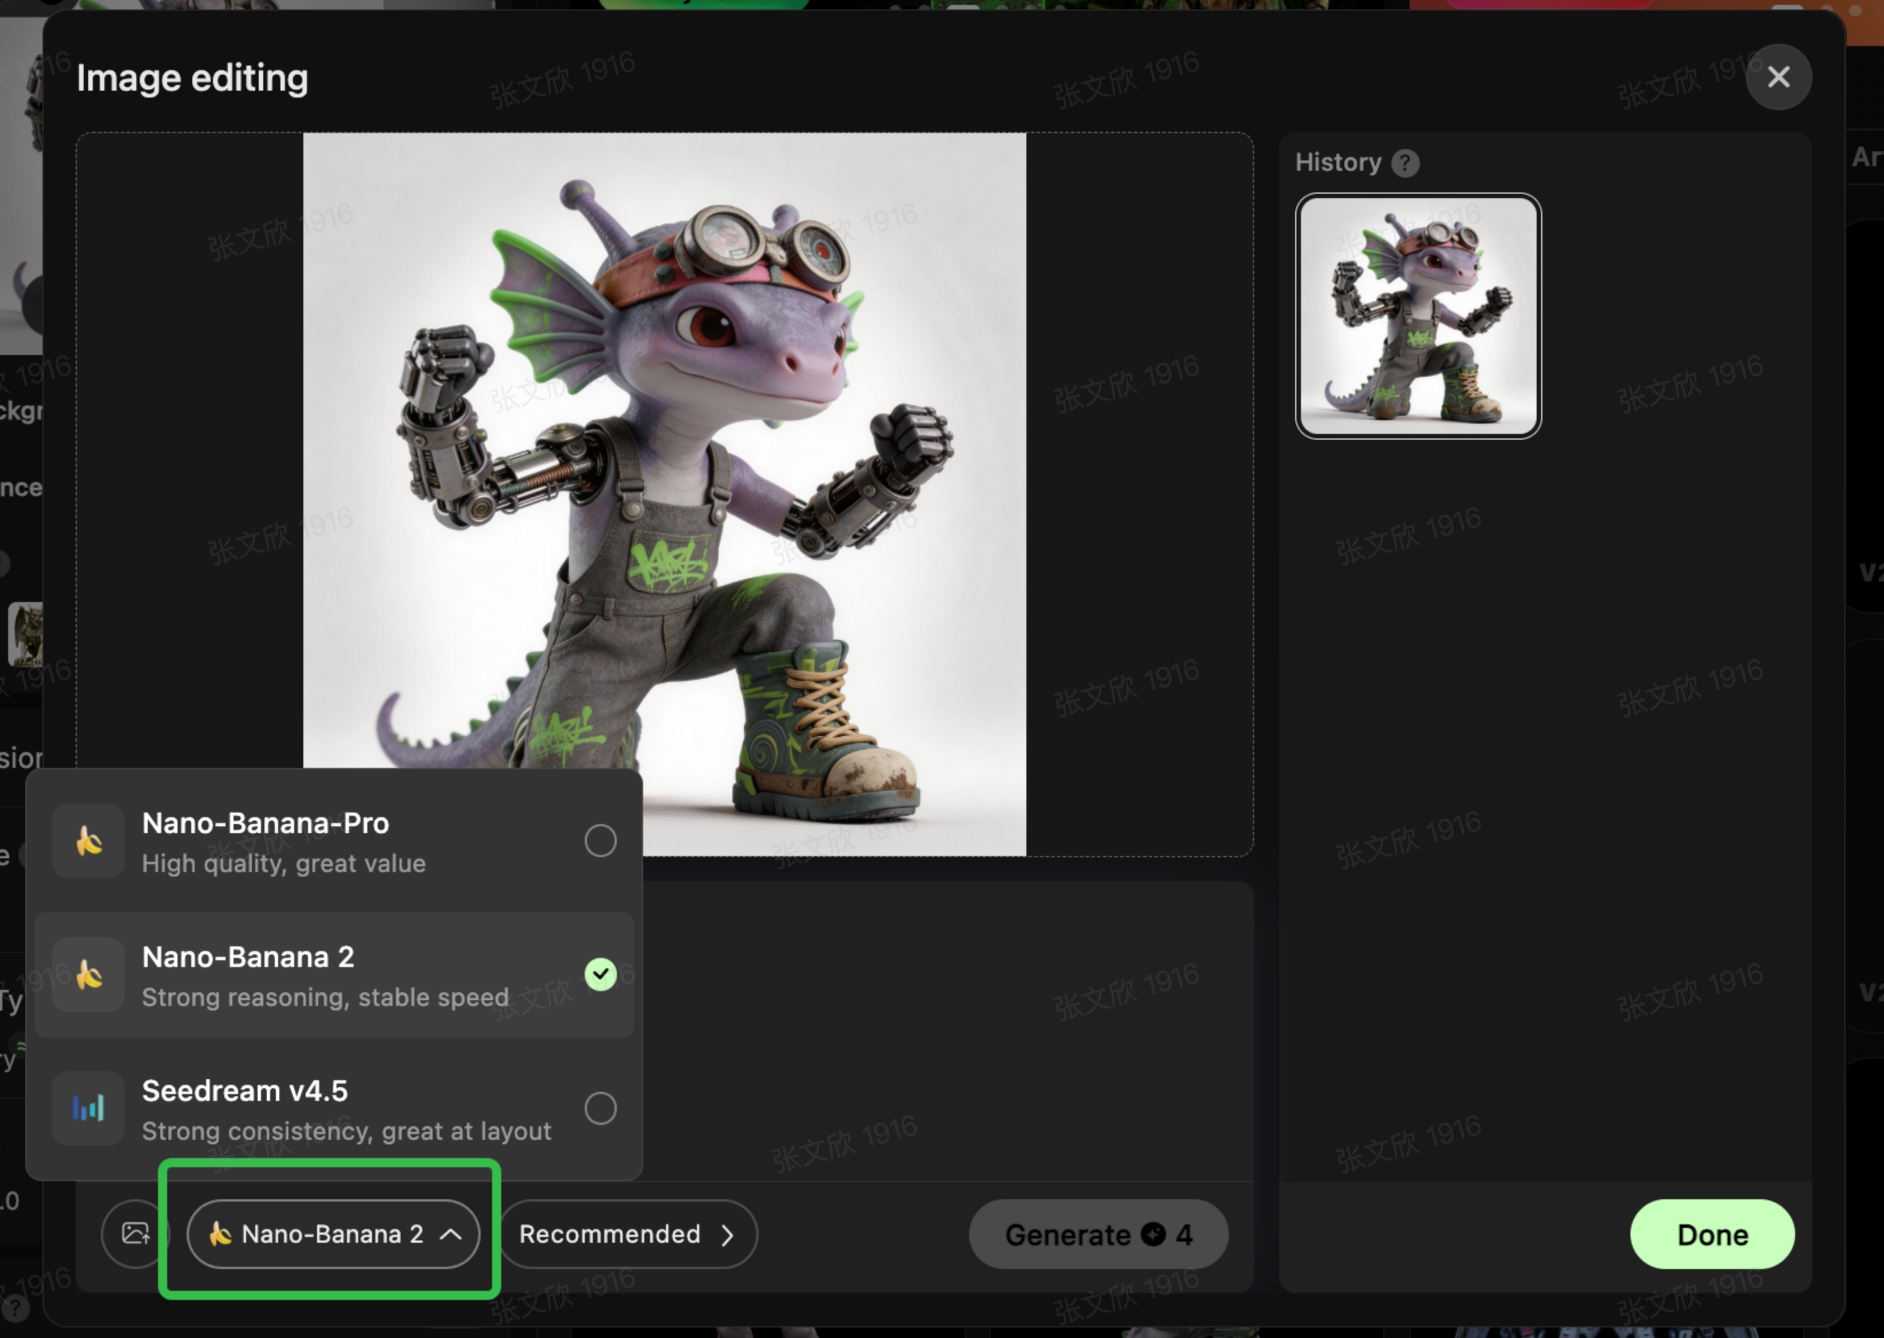
1. Model Selection: Match Your Needs, Optimize Every Image with the Best Algorithm
Core Principle: Different AI models are optimized for different scenarios. Choosing the right model will greatly enhance both your editing results and subsequent 3D generation.
- Nano-Banana 2: Focuses on “strong reasoning + stable speed.” The go-to choice for everyday, general-purpose scenarios. Balances editing efficiency and stability. Ideal for line art, illustrations, standard product images, and most other materials.
- Nano-Banana-Pro: Focuses on “high quality + great value.” Provides more accurate detail reconstruction, color, and texture processing. Perfect for materials with high requirements for image quality and texture (e.g., e-commerce product shots, high-res illustrations).
- Seedream v4.5: Focuses on “high consistency + layout optimization.” Excels with complex compositions and multi-element materials. Maintains overall scene logic, preventing visual breakdowns during editing/generation.
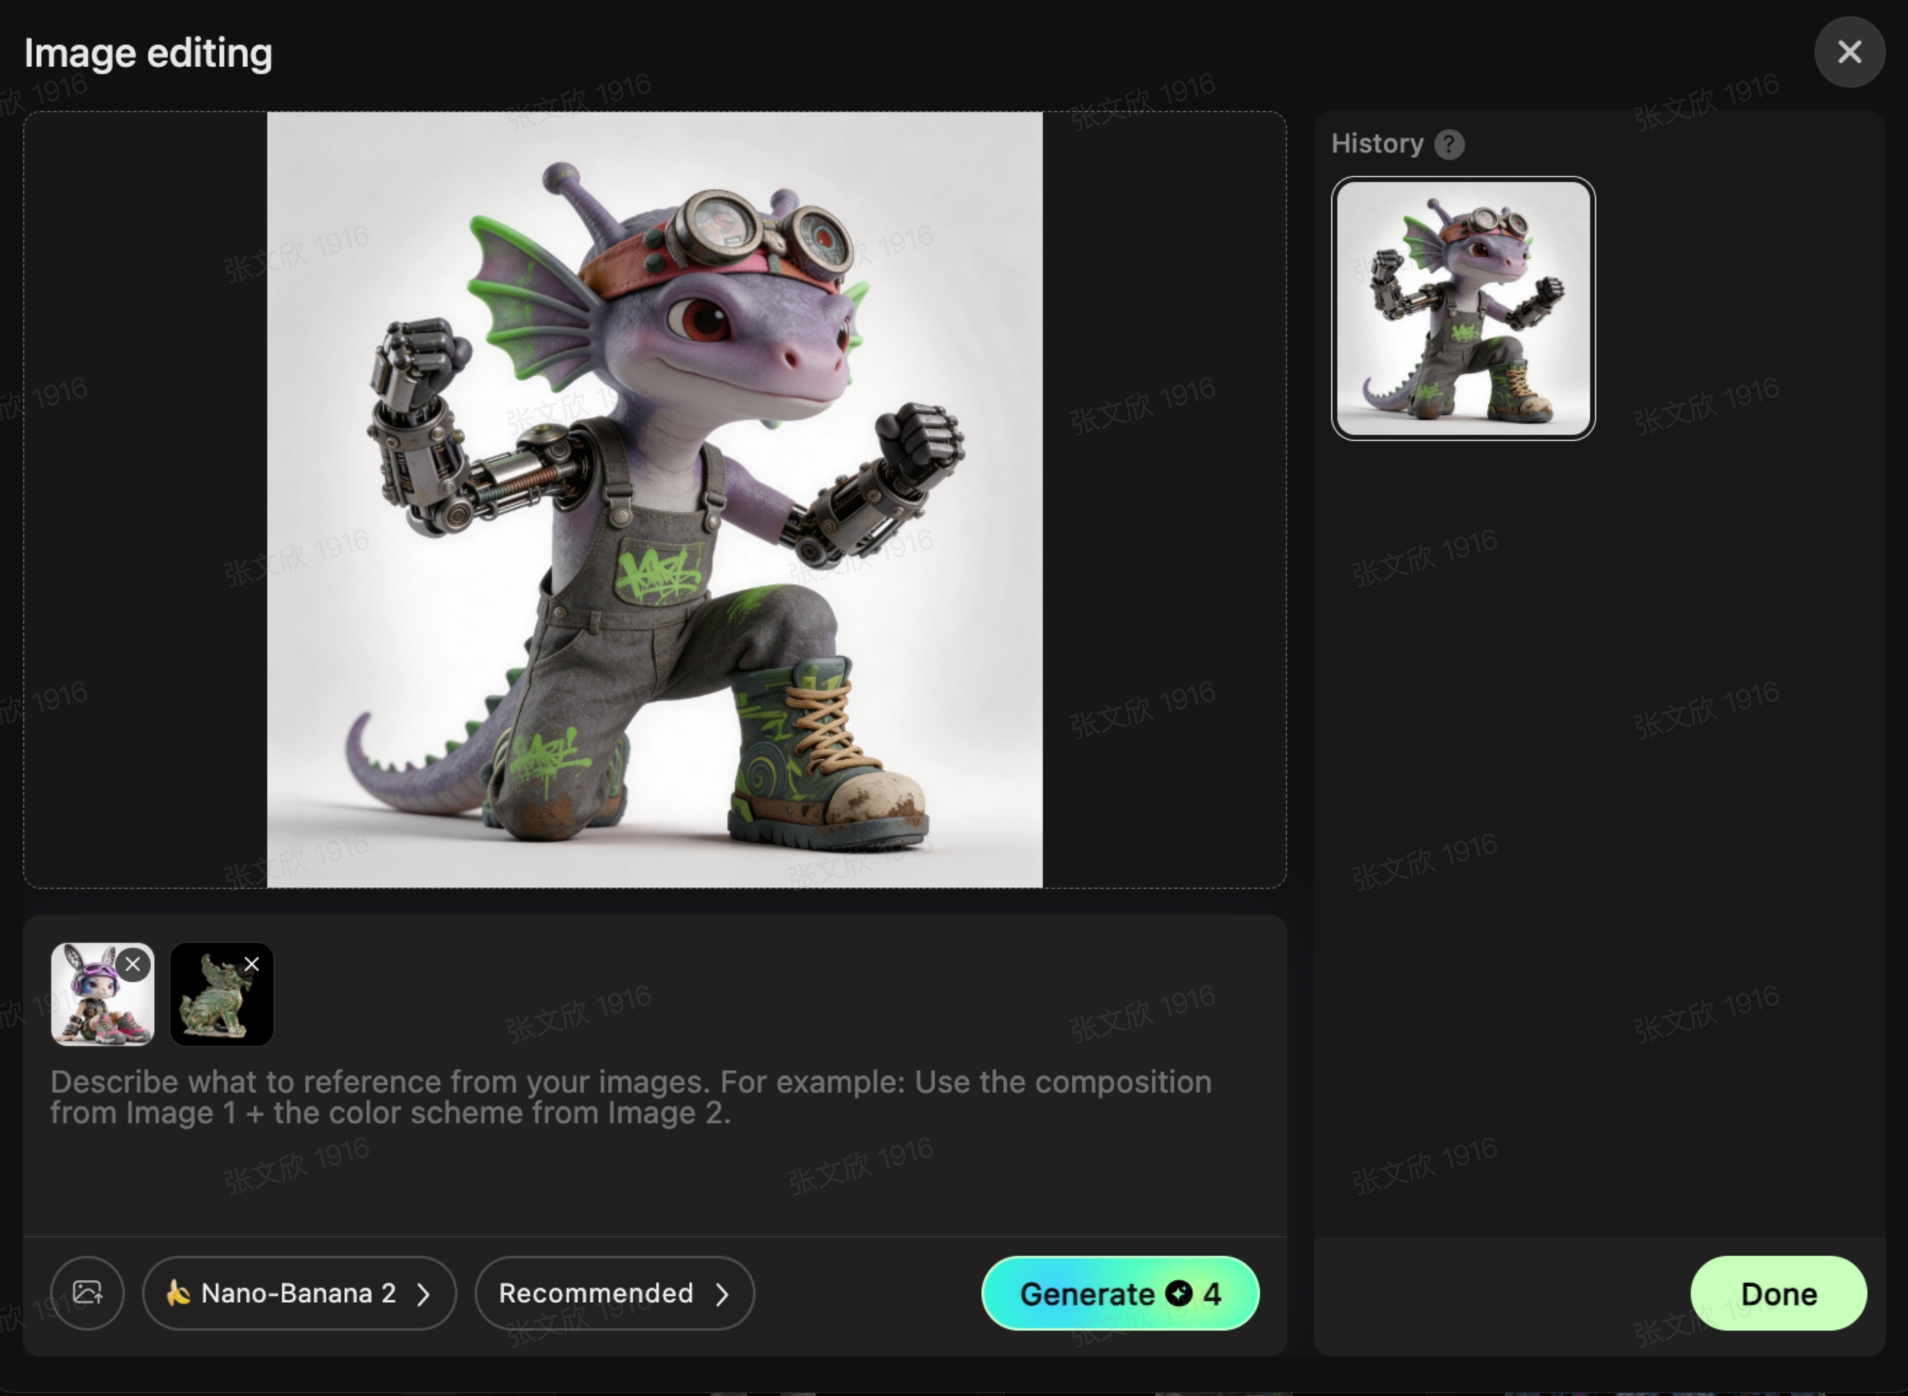
2. Multi-Reference Image Upload: Define Effects with References, Say Goodbye to “AI Guessing”
Core Principle: Supports uploading up to 4 reference images simultaneously, allowing the AI to precisely understand your desired style, details, structure, or texture. This avoids ambiguity in text descriptions and ensures editing results perfectly match your vision.
Use Cases: Coloring line art, changing materials on product images, matching illustrations to a specific style, optimizing lighting/composition of materials.
Steps:
- In the image editing interface, click the “Add Reference Image” icon in the bottom left.
- Upload up to 4 reference materials (can be for style, material, or composition).
- Combine with subsequent text descriptions or editing commands. The AI will optimize your original image using the reference features.
- After editing, click “Generate” to create a new image that incorporates the reference features.
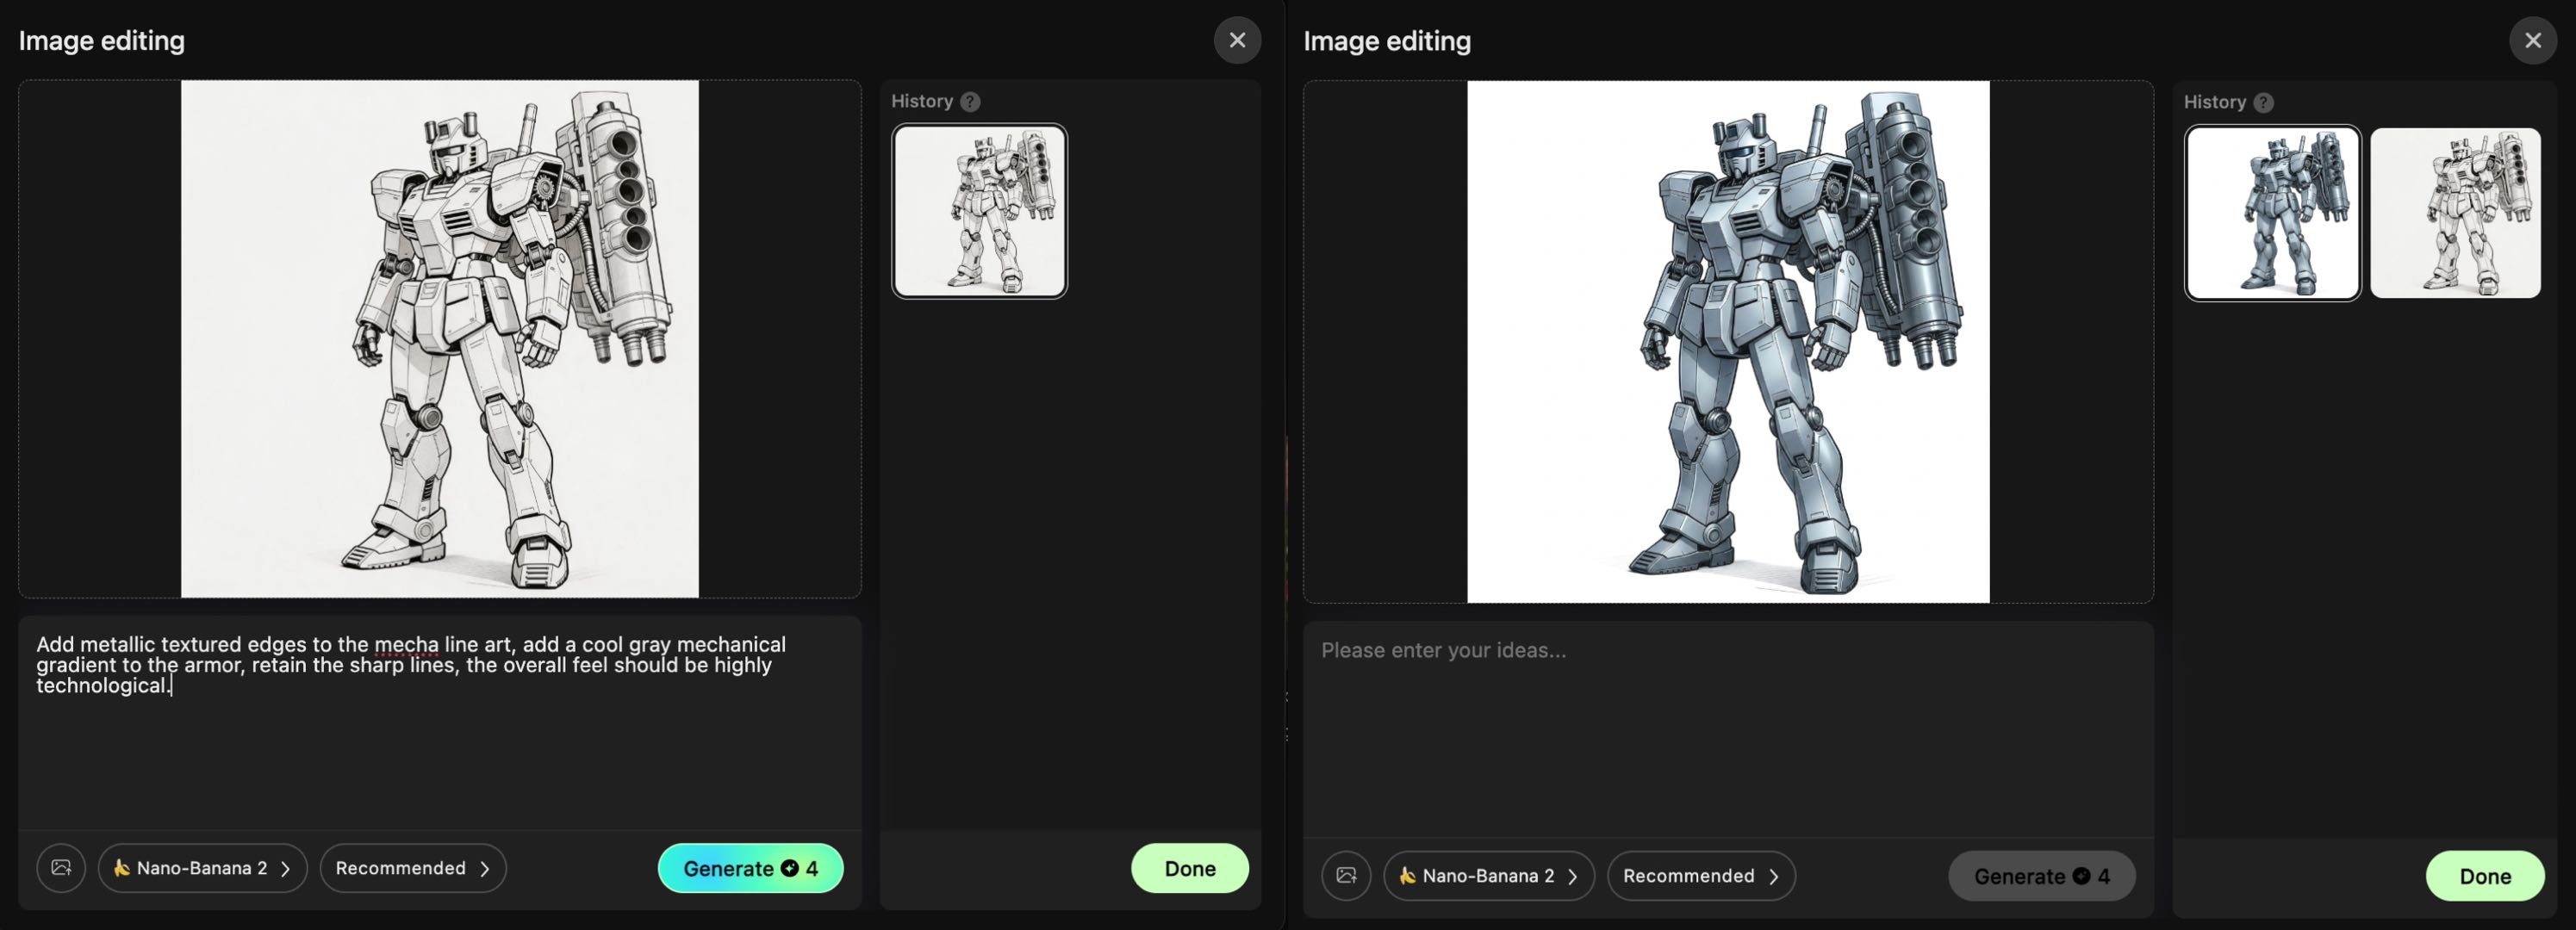
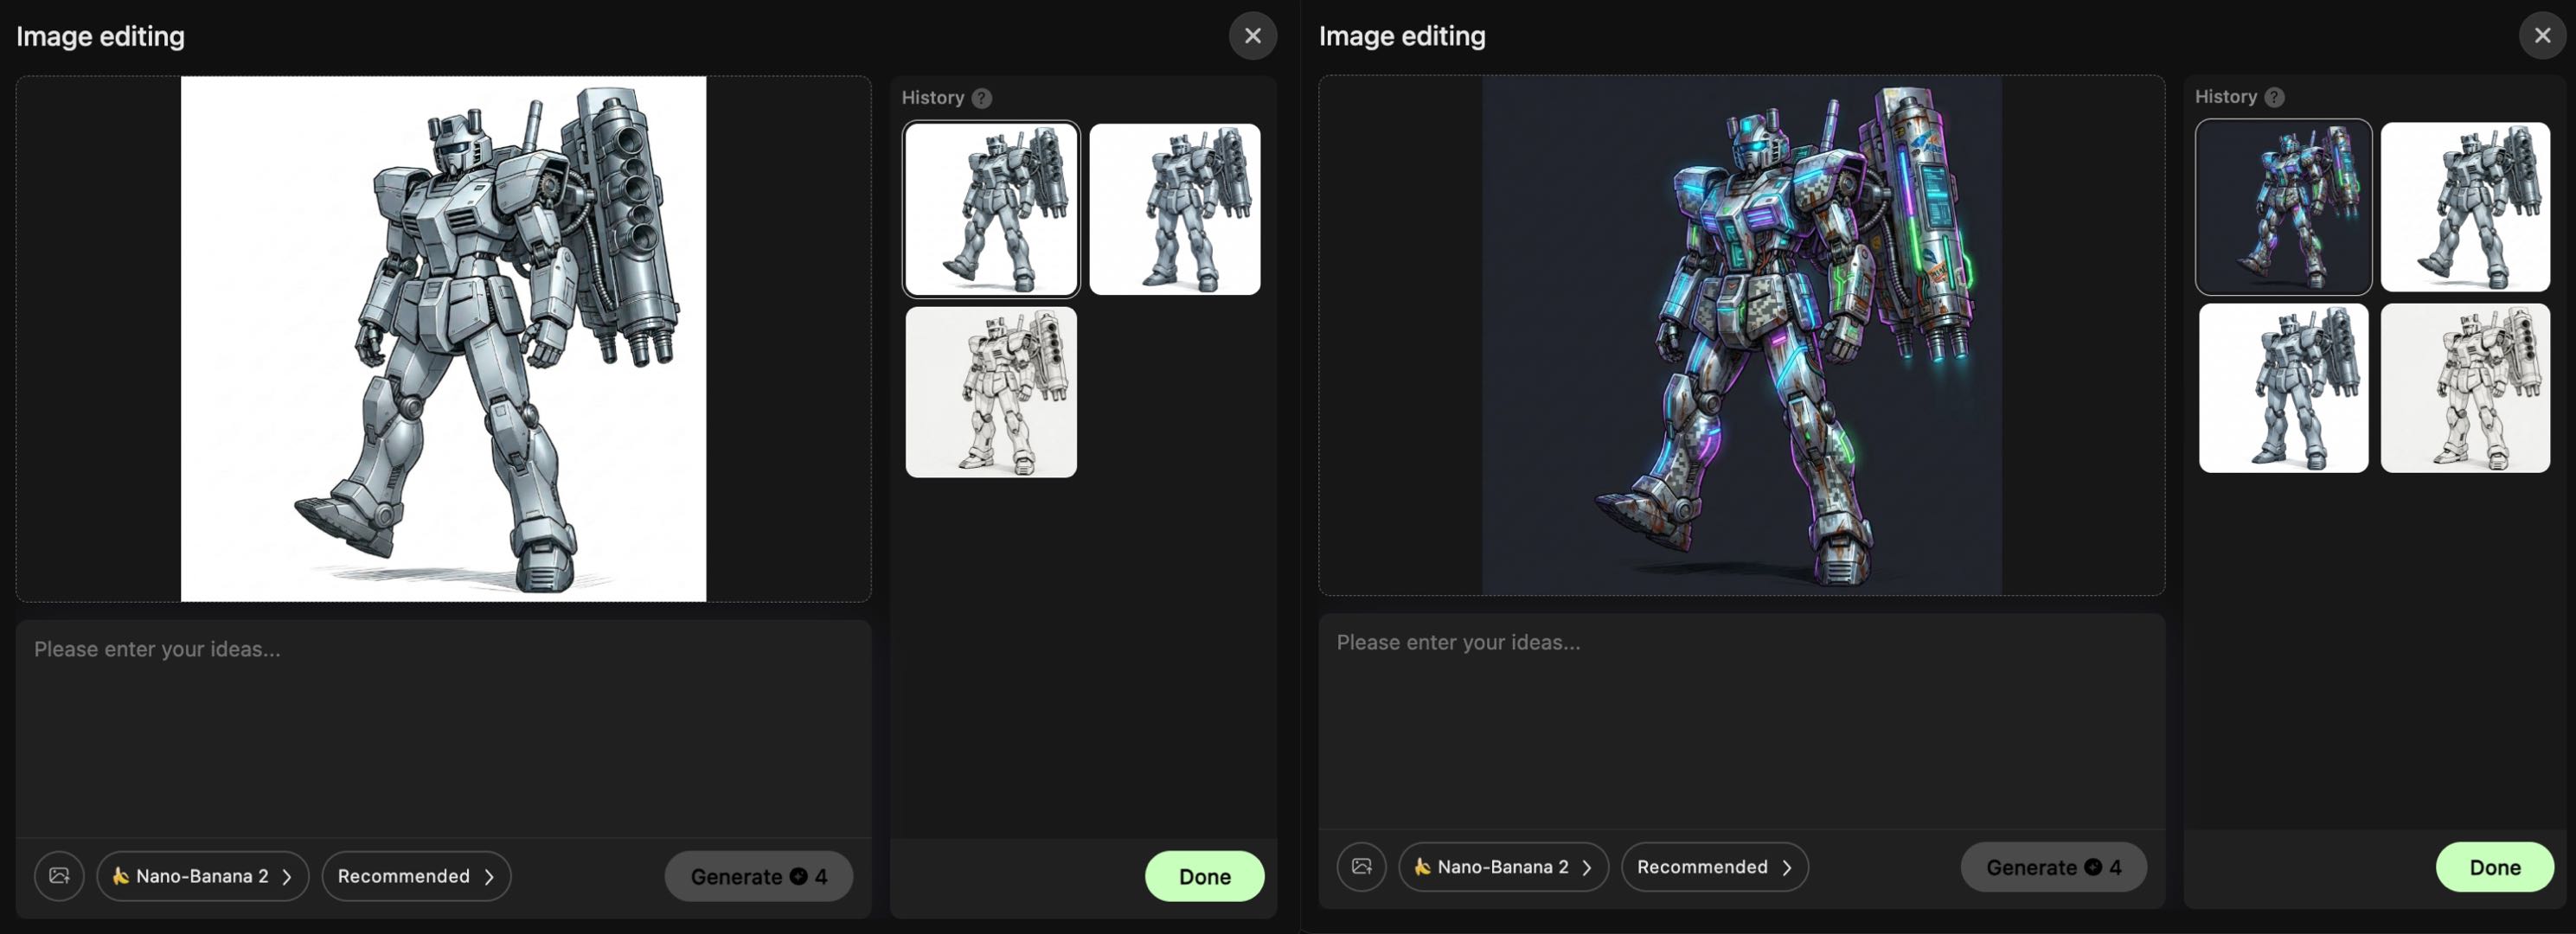
3. Text Instruction Editing: Achieve “What You Think Is What You Get” with Natural Language
Core Principle: Enter your desired modifications in the “Enter your idea” text box. The AI optimizes your material in real-time based on your command + selected model + reference images. Supports style modification, detail enhancement, flaw repair, composition adjustments, and more.
Use Cases & Examples
- Example 1 (Coloring Line Art): Add metallic textured edges to the mecha line art, add a cool gray mechanical gradient to the armor, retain the sharp lines, the overall feel should be highly technological.
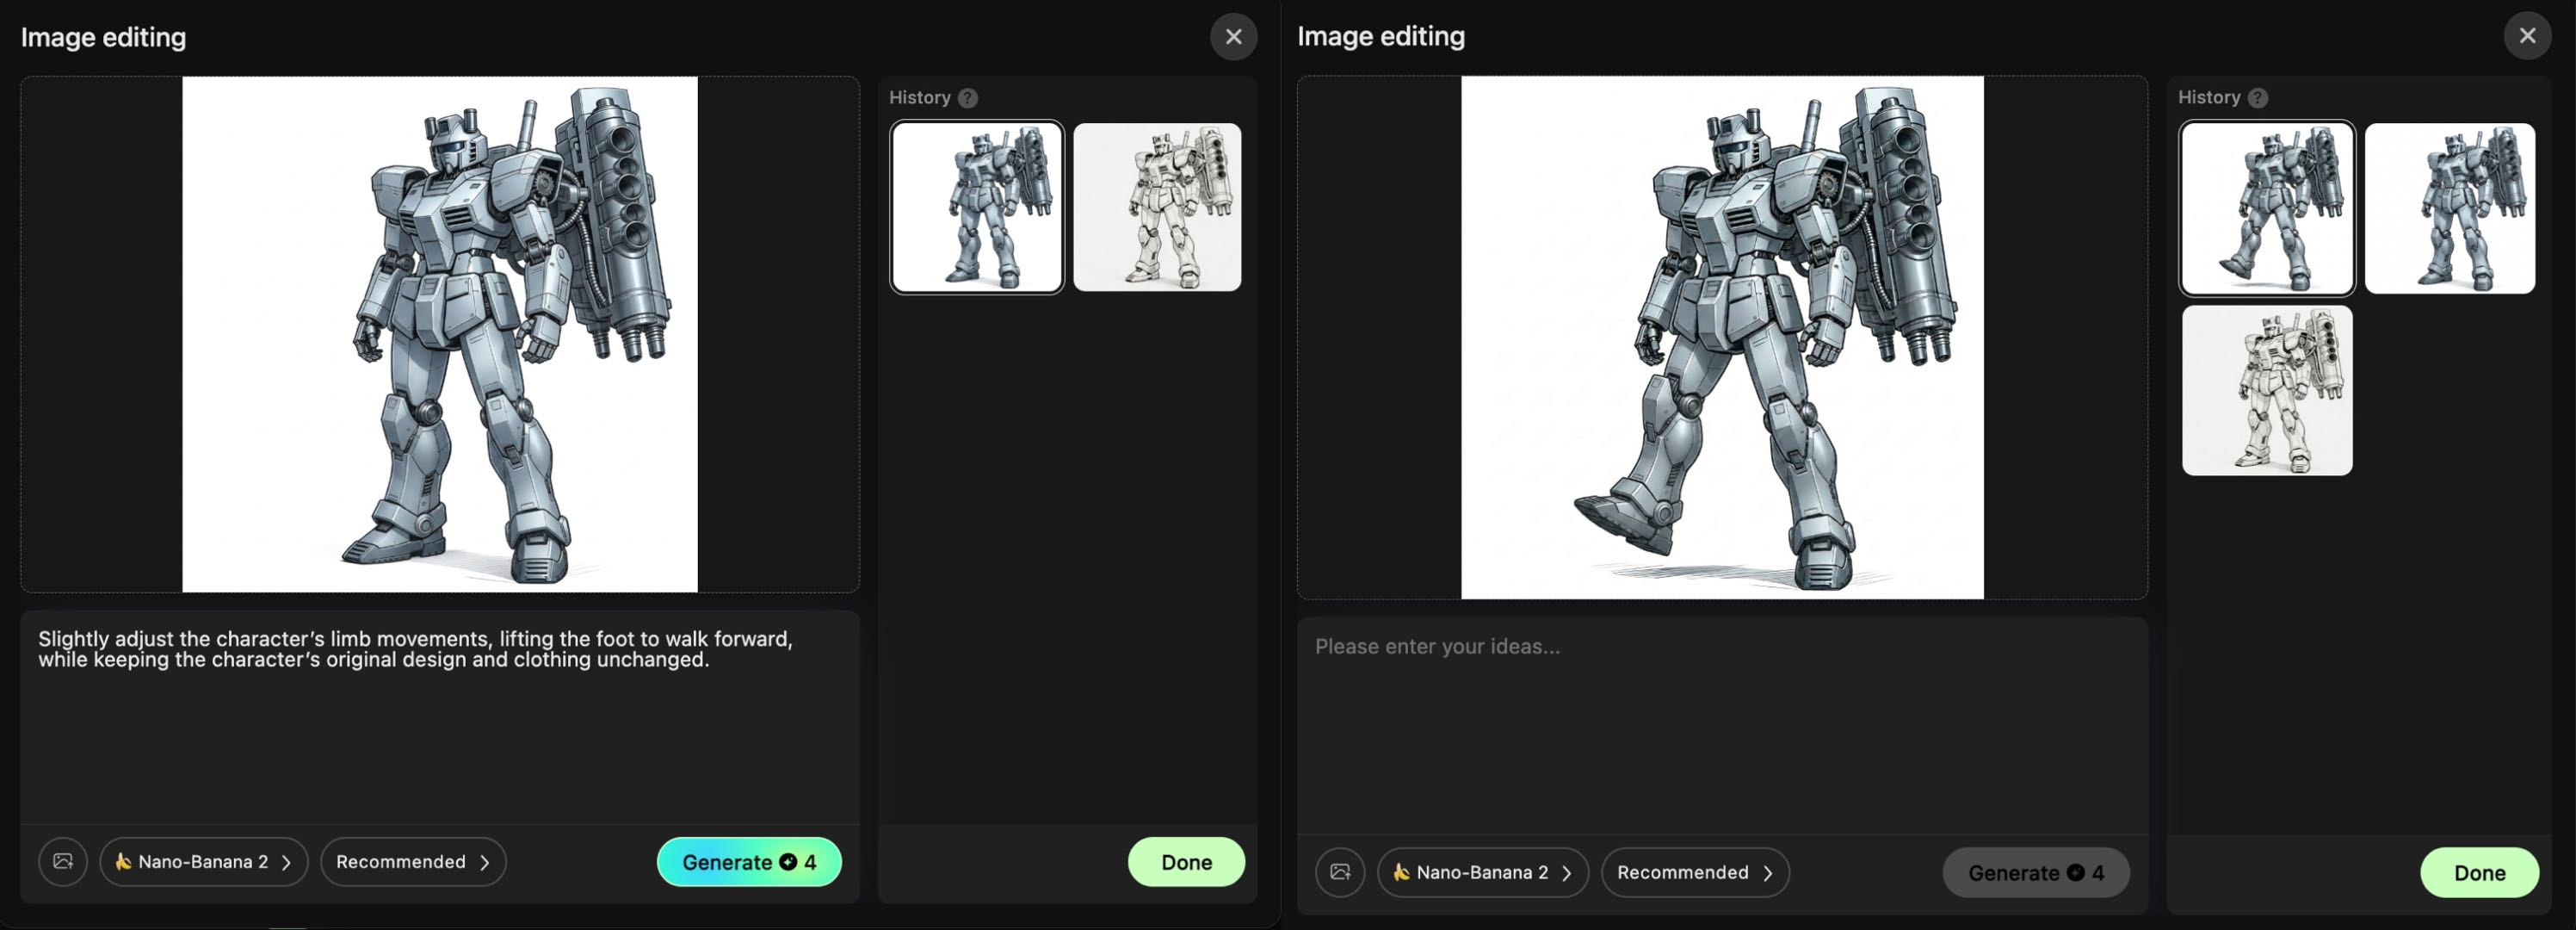
- Example 2 (Adjusting Character Pose): Slightly adjust the character’s limb movements, lifting the foot to walk forward, while keeping the character’s original design and clothing unchanged.
- Example 3 (Style Modification): Change this character to a cyberpunk style, keep the background clean and solid color, maintain the main structure unchanged.
Steps:
- Enter your modification command in the text box. Be as specific as possible (include subject, desired effect, style, constraints).
- Ensure the model and reference images (if any) are set correctly, then click “Generate.”
- Wait for the AI to generate the result, preview it, and feel free to adjust your command and regenerate if needed.
Beyond natural language smart editing, the tool also includes three specialized editing capabilities to comprehensively meet material optimization needs.
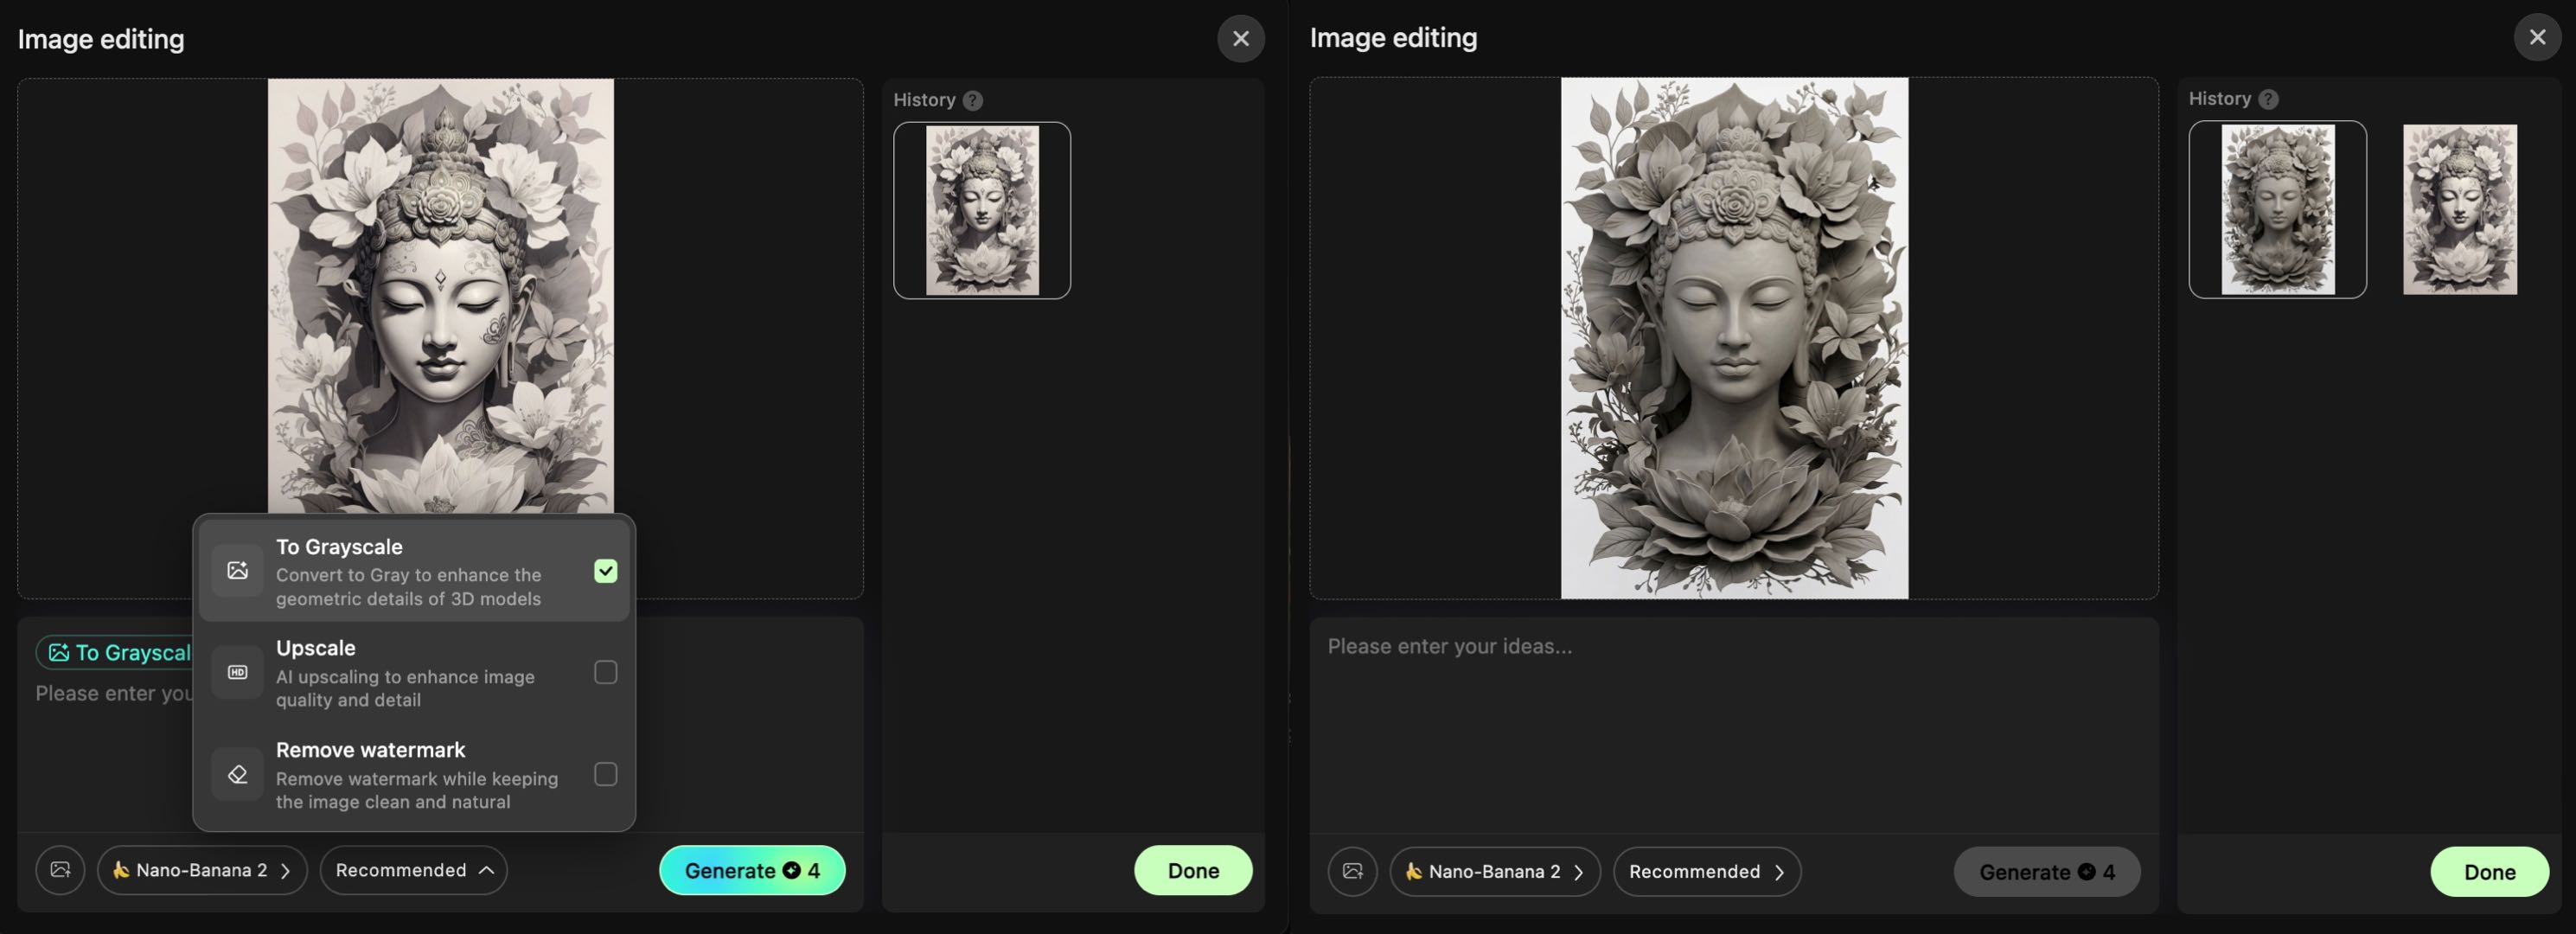
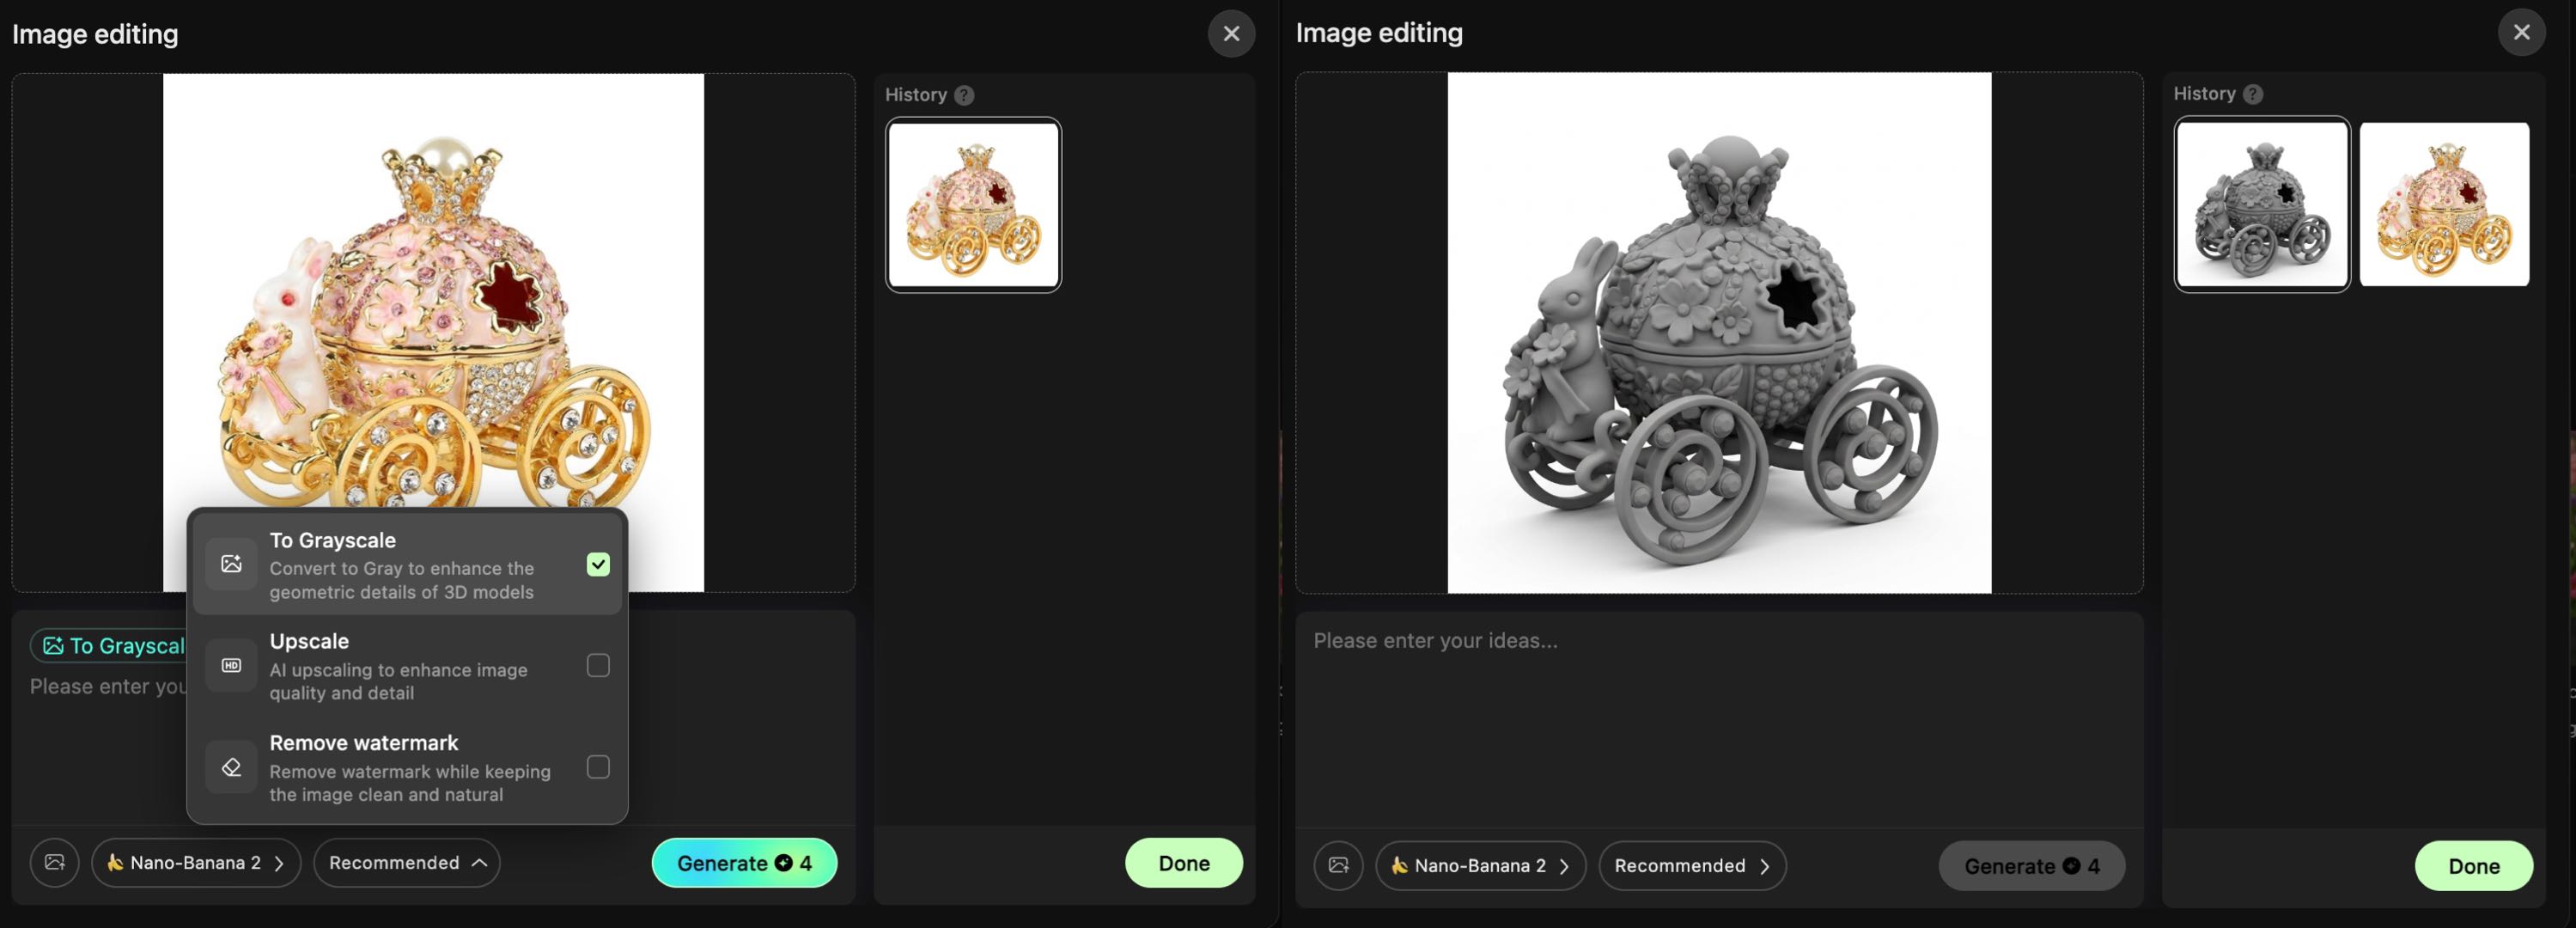
4. Grayscale Mode: Enhance Geometric Details for Better 3D Structure
Core Principle: Grayscale mode removes color information, converting the image to black and white. This enhances lines, contours, and light-dark contrast, helping the AI more accurately identify an object’s 3D structure and geometric details. Particularly suitable for line art, illustrations, cultural relics, and reliefs.
Use Cases:
- Converting B&W line art/sketches to 3D models (e.g., statues, characters, product line art).
- When color images have unclear outlines, leading to “flat” 3D generations.
- For reliefs, stamps, and texture materials needing to highlight height/depth information.
Steps:
- Upload your line art to Hi3D and enter “Image Editing.”
- Click the function menu and check “Grayscale Mode” (default setting).
- Preview the effect. The B&W line art becomes a high-contrast grayscale image with sharper edges.
- Click “Generate.” The AI will create a more structurally detailed 3D model based on the enhanced grayscale information.
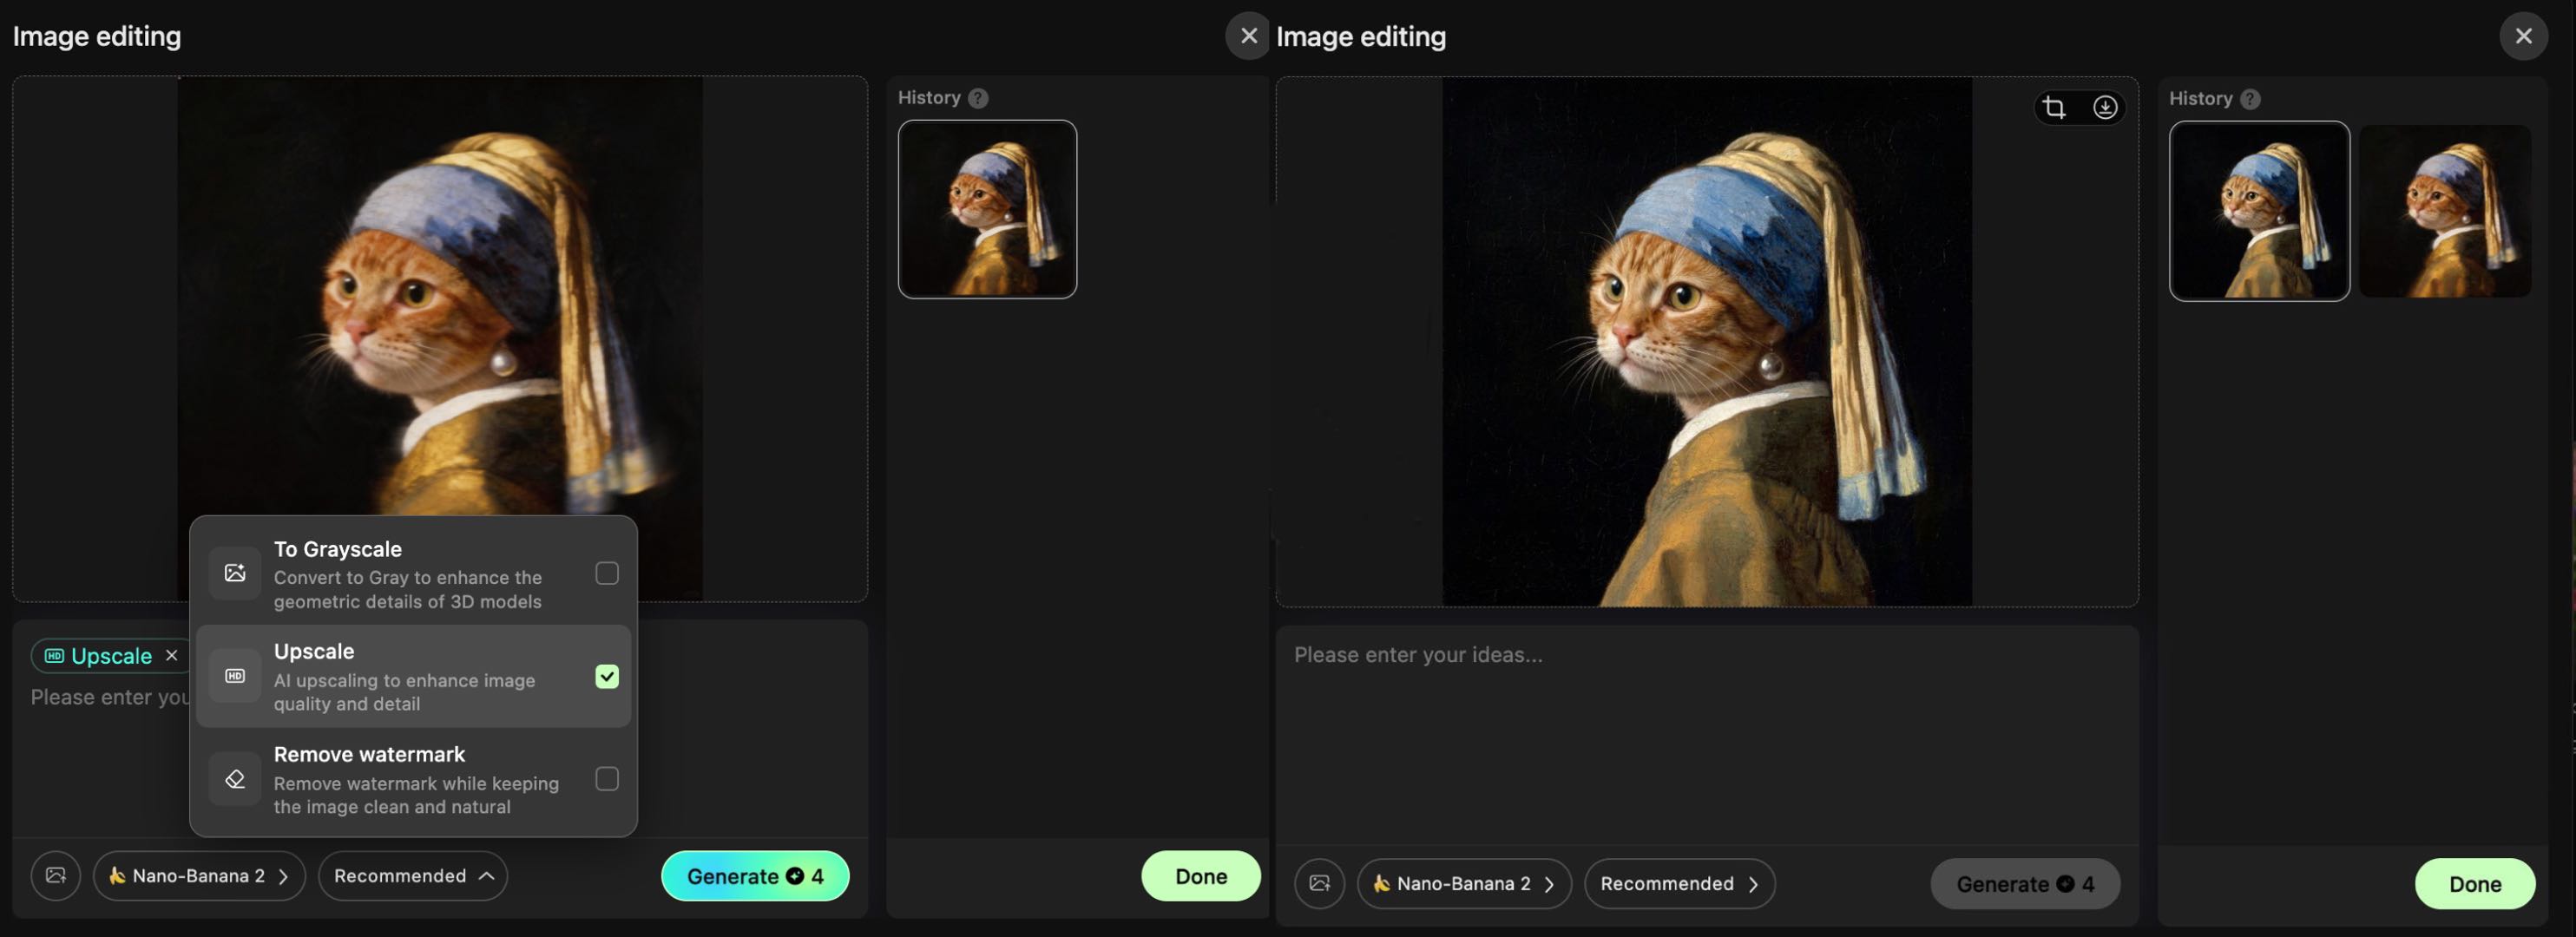
5. HD Restoration: Turn Low-Quality Material into “Modeling-Grade” Images
Core Principle: Uses AI super-resolution technology to rebuild details in blurry, low-pixel, or highly compressed images. Increases resolution while repairing noise, jagged edges, and blurred areas. Allows the AI to capture more material textures (like fabric, metal, wood), preventing generated models from looking “pixelated.”
Use Cases:
- Old phone photos or low-res web images to be turned into 3D figures/decorations.
- Scans or screenshots lacking resolution for 3D model details.
- Vintage illustrations or comic screenshots needing clarity enhancement for 3D generation.
Steps:
- Upload a blurry photo.
- Enter “Image Editing” and check “HD Restoration.”
- Wait for AI processing. The preview will show the restored high-definition result.
- Optionally combine with Grayscale Mode for enhanced contours, then click “Generate” for a highly detailed 3D model.
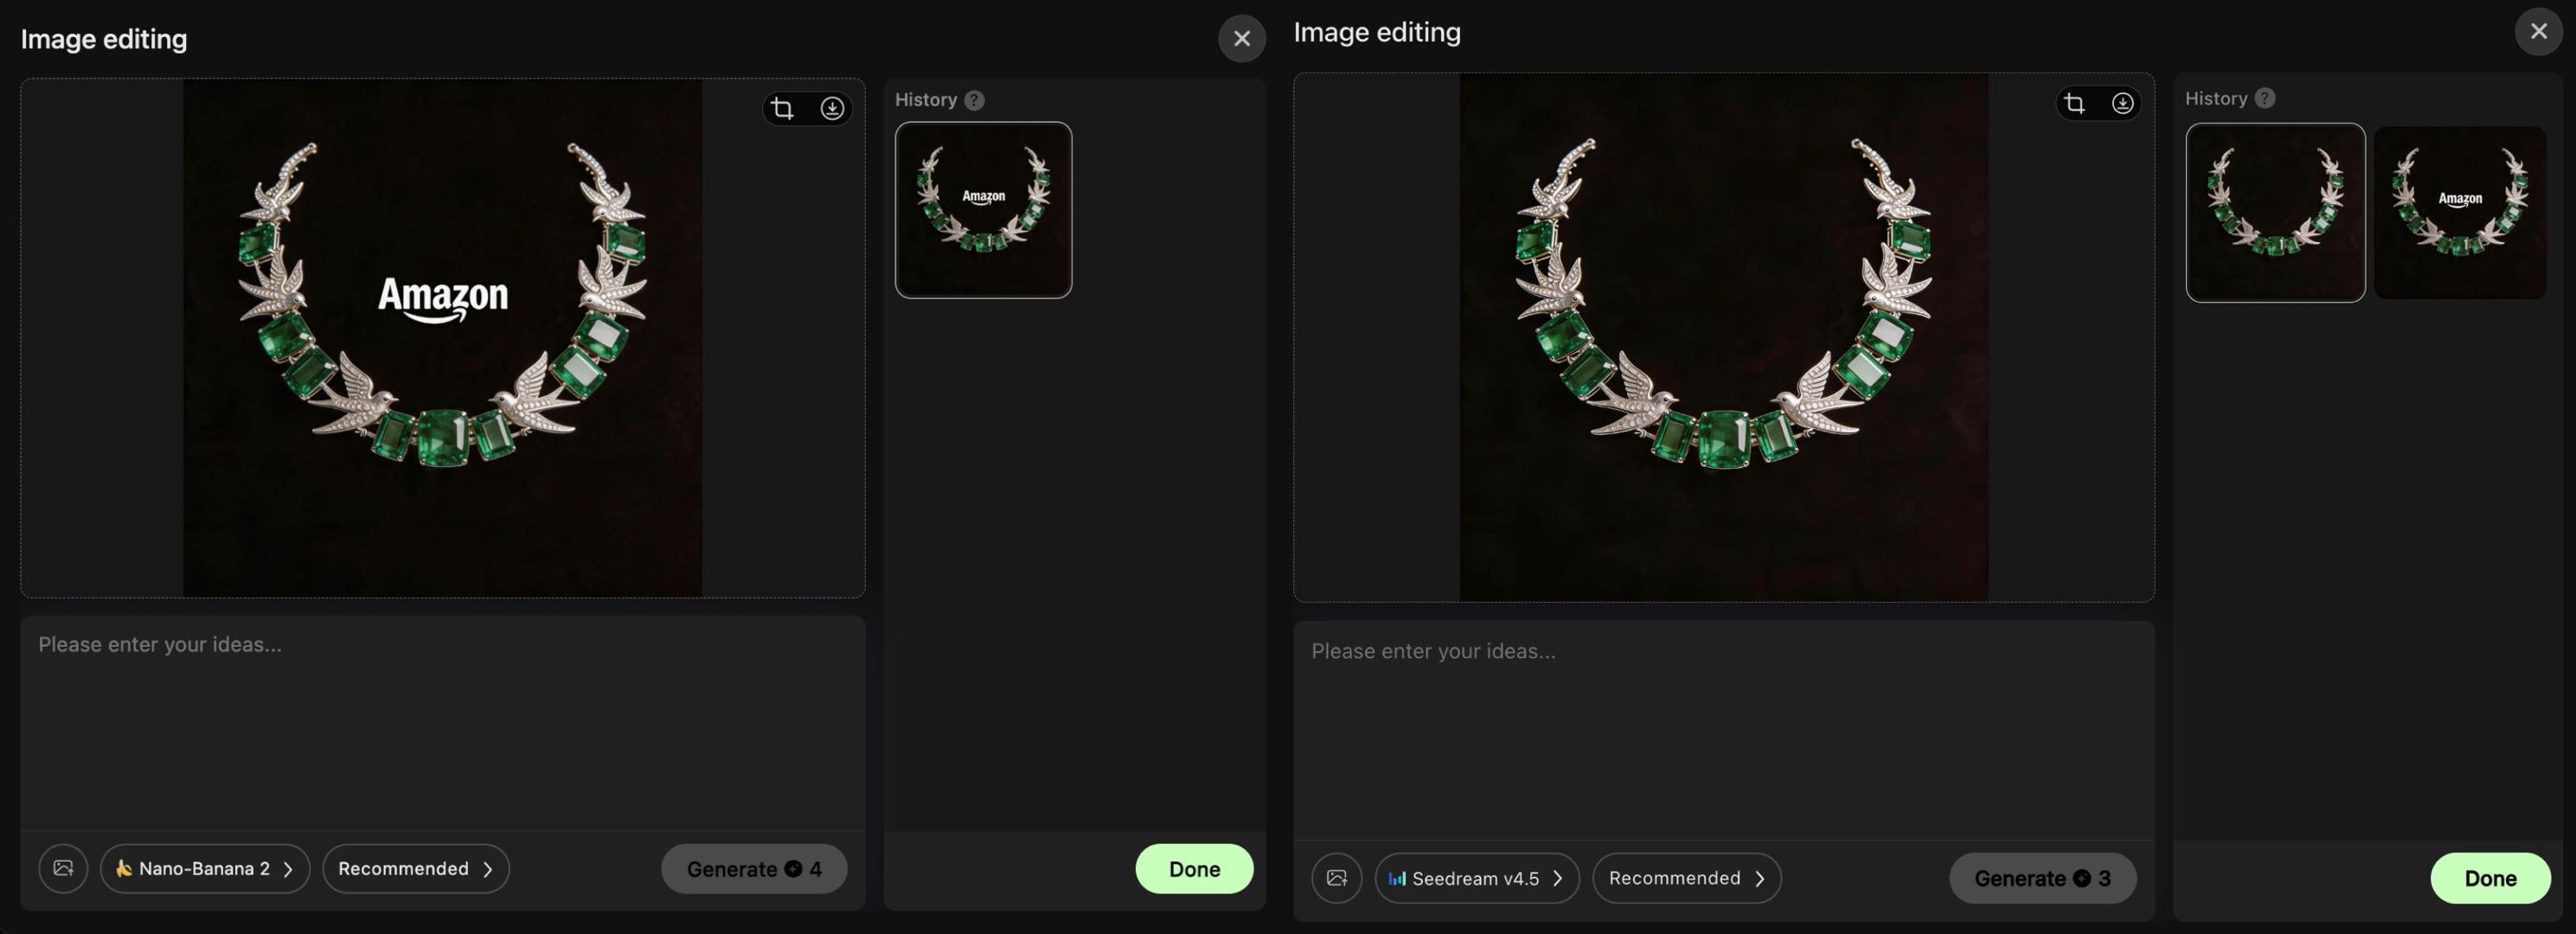
6. Watermark Removal: One-Click Distraction Removal for Clean Modeling Materials
Core Principle: Uses AI content-aware fill technology to intelligently identify and remove watermarks, text, logos, and other distracting elements. Automatically repairs the obscured background and subject texture, preventing the AI from misinterpreting watermarks as part of the object’s structure (avoiding unwanted bumps/dents in the model).
Use Cases:
- Web images or e-commerce main images with watermarks, destined for 3D product models.
- Design drafts or line art with text annotations that interfere.
- Screenshots with UI elements or borders that affect 3D generation quality.
Steps:
- Upload a product image with a visible watermark.
- Enter “Image Editing” and check “Watermark Removal.”
- The AI automatically identifies and removes the watermark, restoring the surface texture and background.
- Combine with HD Restoration and Grayscale Mode for further optimization, then generate a model with no unwanted artifacts and precise texture mapping.
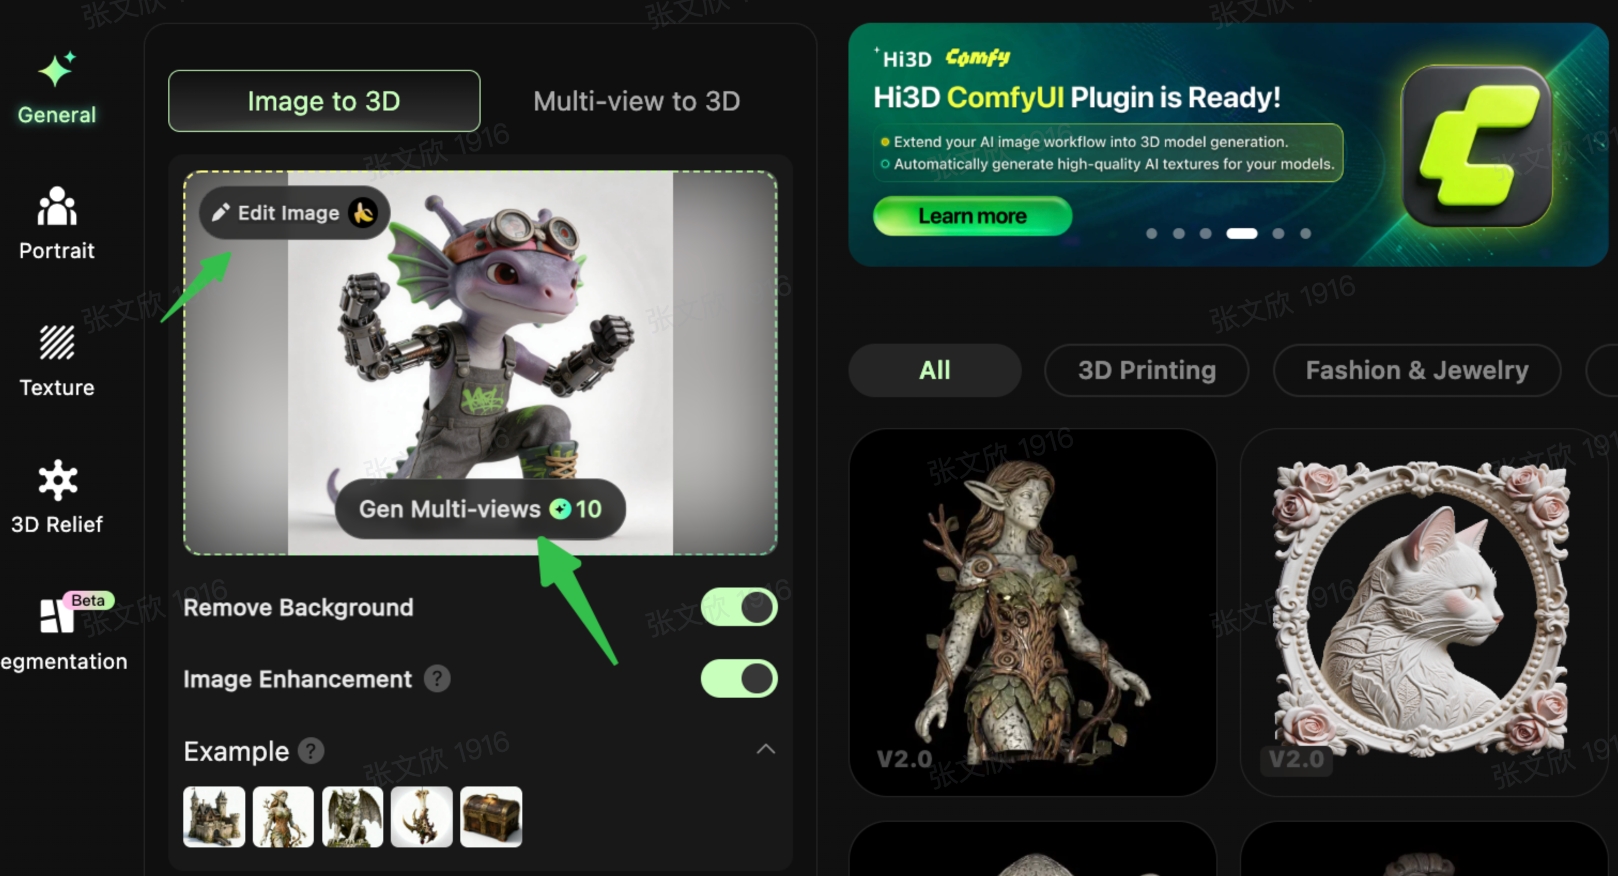
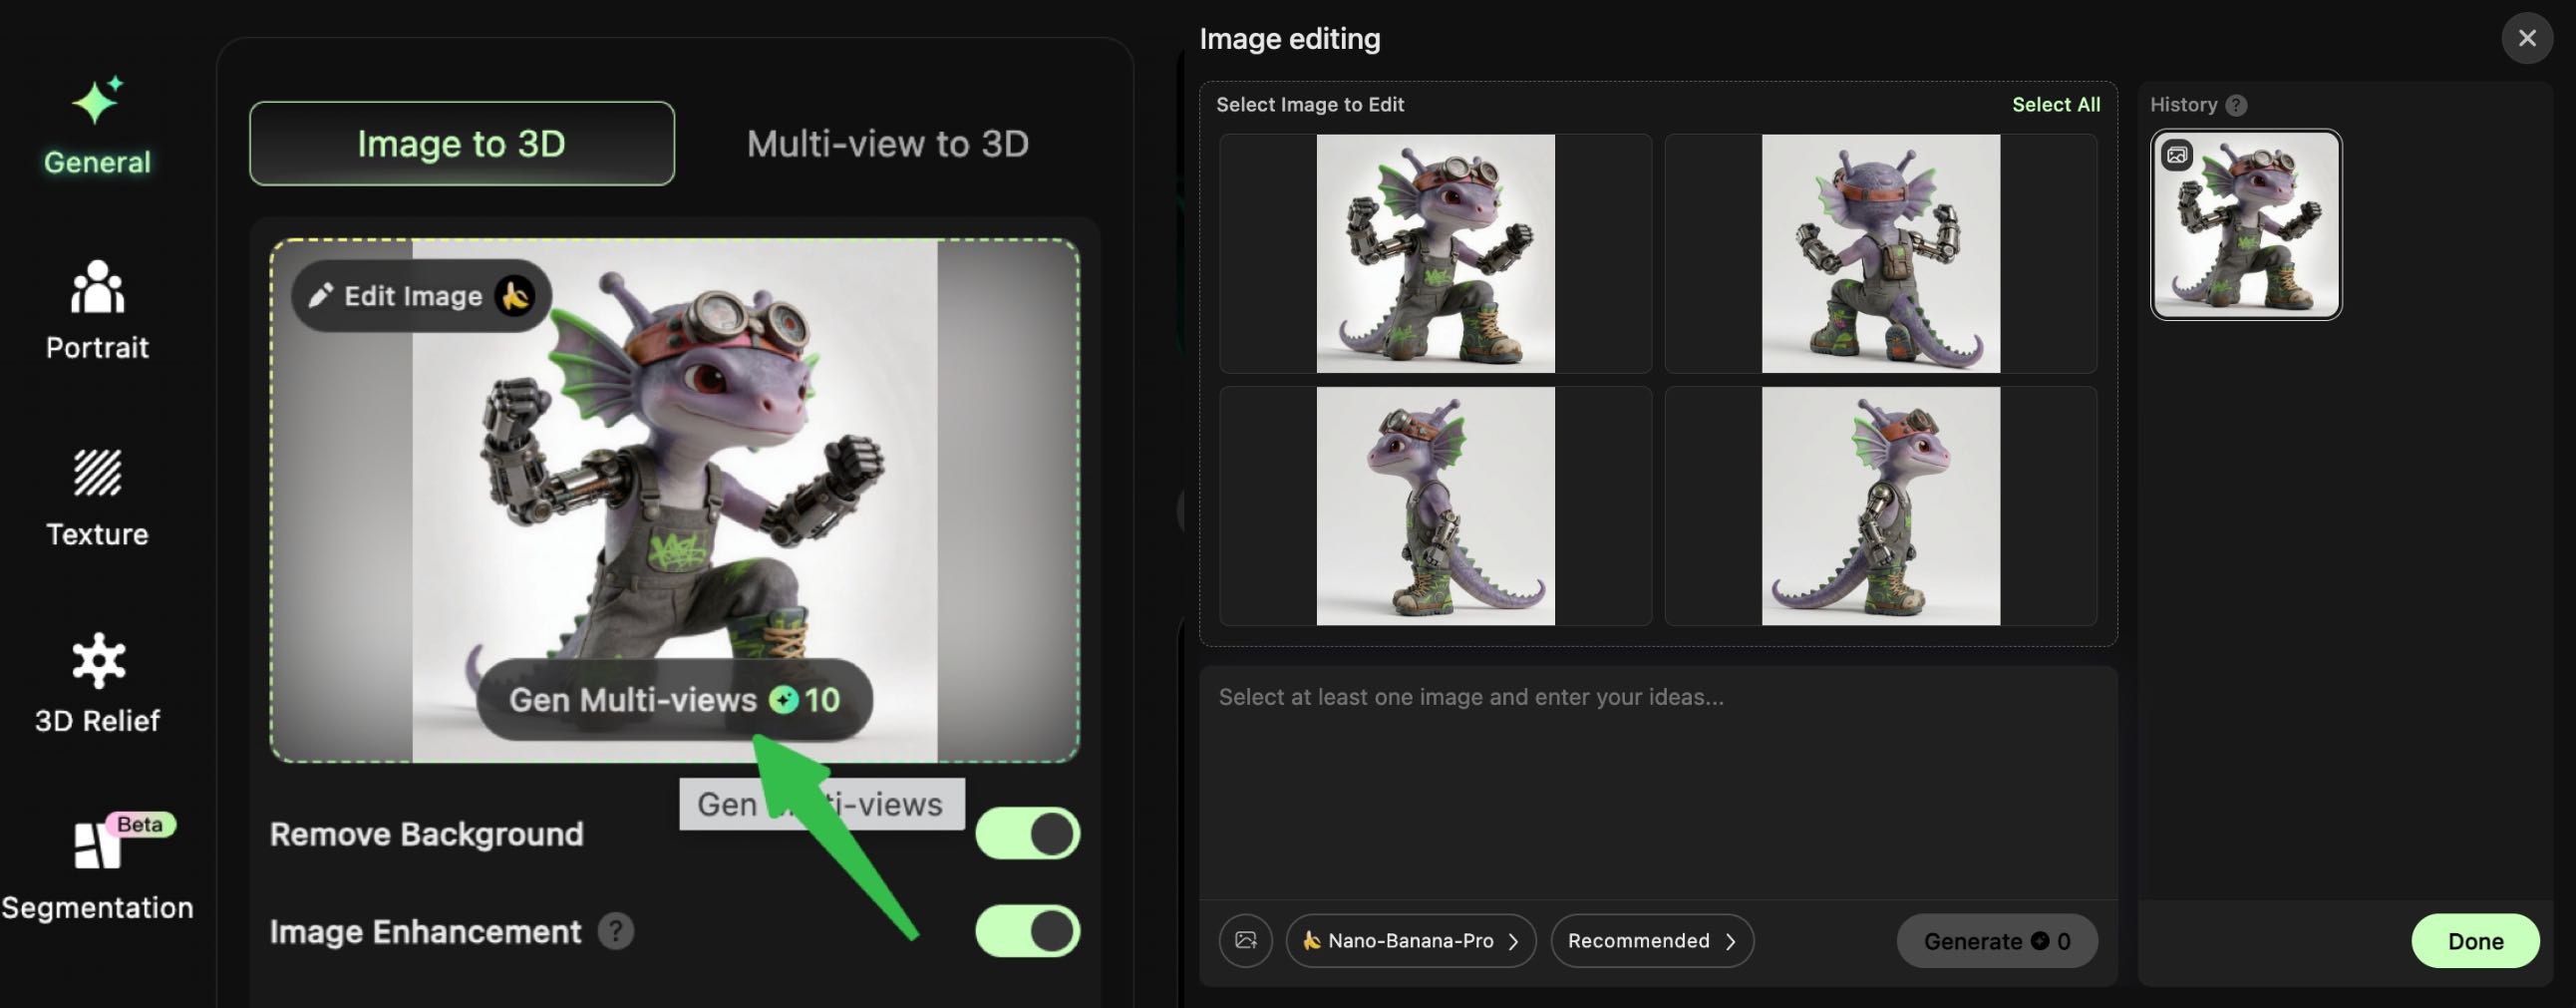
7. Automatic Multi-View Generation: One-Click Completion of Multiple Angles to Solve 3D Structure Gaps
Generating 3D from a single-view image often results in blank backs, distorted sides, and collapsed structures. The Automatic Multi-View feature uses AI to intelligently deduce front, side, back, and angled views, completing the 3D structural information.
Core Value: Specifically designed for multi-view to 3D generation. Eliminates visual blind spots, ensuring the final 3D model has complete structure from all sides, no mesh intersections, and no missing parts. Suitable for all categories: figures, sculptures, props, characters, cultural/creative ornaments, etc.
Steps:
- After completing the editing and optimization of your original image.
- Click the “Generate Multi-View” function button.
- The system automatically outputs a full set of multi-angle view materials.
- All view files are automatically saved to your asset library, ready for direct use in 3D generation.
- (Optional) Freely input specific requirements.
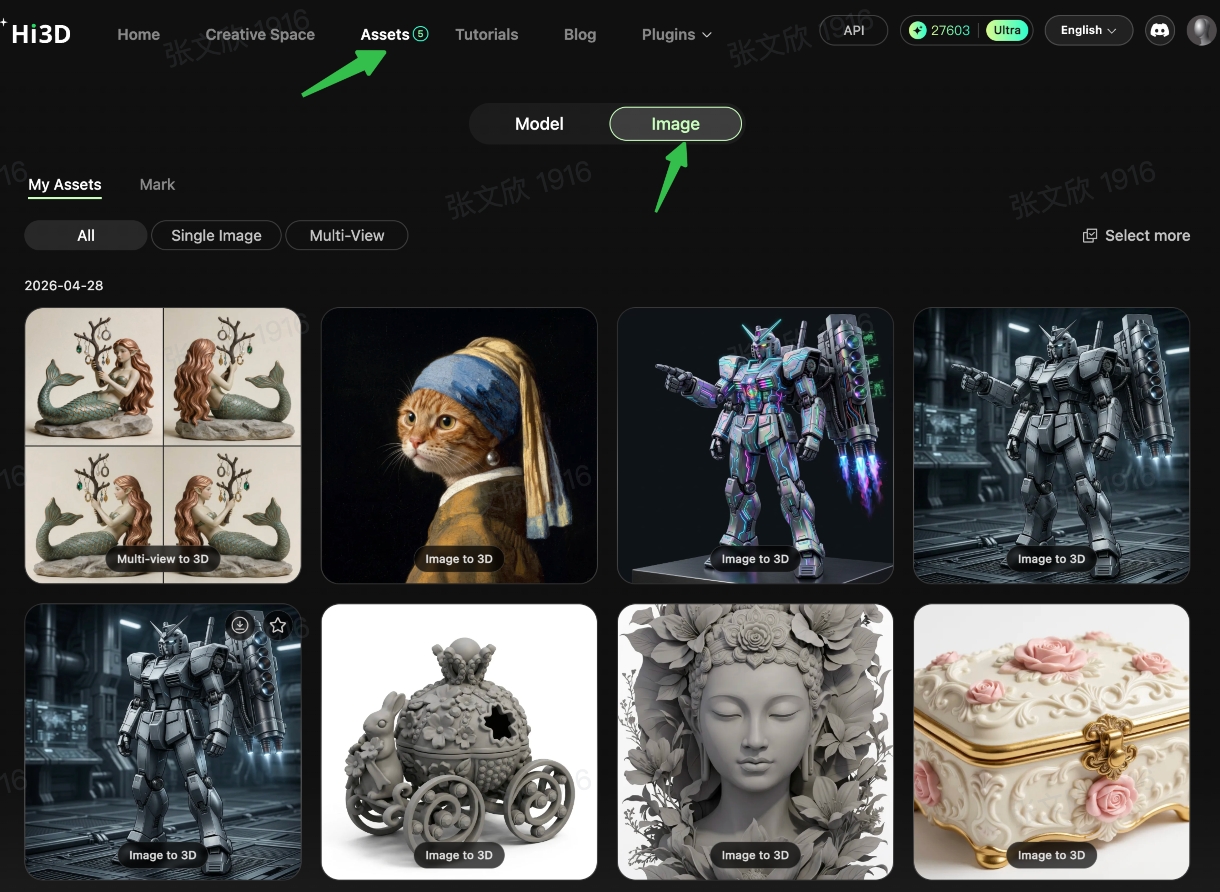
8. Unified Material Viewing: Asset Library Archiving
All images generated from editing, AI creation, or automatic multi-view generation are automatically saved to your personal asset library. This allows for easy reuse, re-editing, or direct use in 3D generation at any time.
Viewing Path:
- Go to “Assets” at the top of the platform.
- Switch to the “Images” category tab.
- Sort by generation time to quickly find all edited results and multi-view materials.
- Supports single or batch selection, and one-click import into a 2D-to-3D task.
III. Functional Value Summary: Why Must You Use Hi3D for 2D-to-3D?
- One-Stop Workflow: Complete the entire process of “upload - optimize - generate” within Hi3D, maximizing efficiency without switching to third-party editing software.
- Beginner-Friendly: No professional image editing skills needed. Materials are optimized with one click, allowing anyone to generate high-quality 3D models.
- Targeted Solutions: Precisely solves common material problems in 2D-to-3D (detail enhancement, quality repair, distraction removal), significantly improving model fidelity.
- Adaptable to Multiple Scenarios: Covers cultural/creative, e-commerce, gaming, figure/model making, and many other industries, meeting diverse user needs.
Start your creative journey with Hi3D for free today!